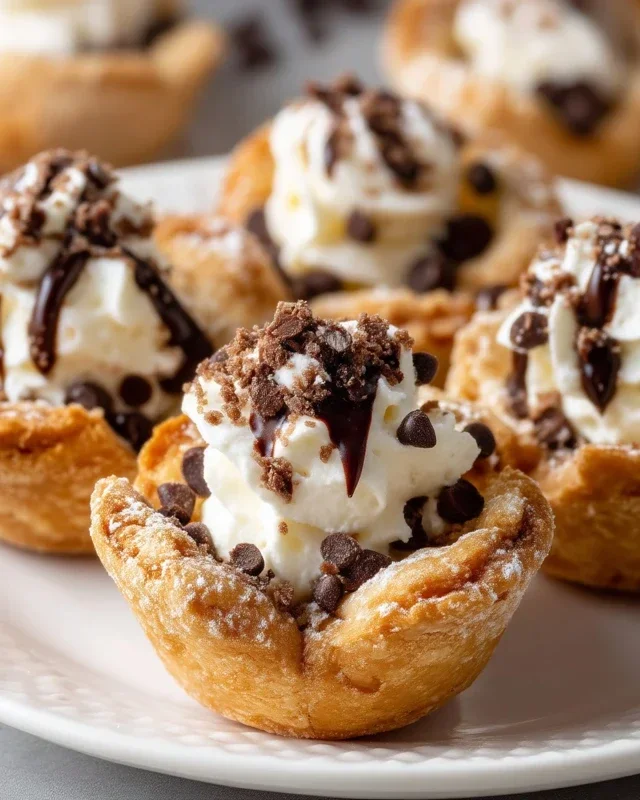
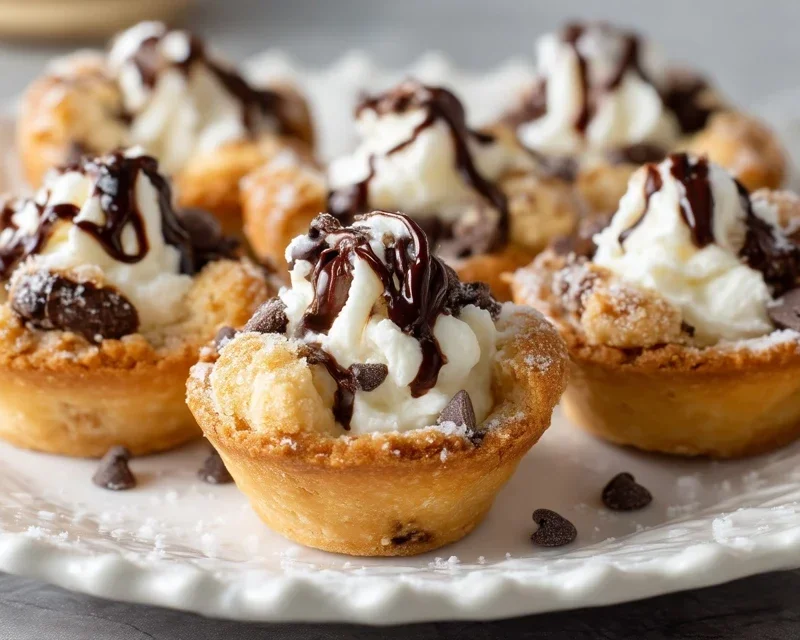
Mini Cannoli Cups- Delicious Italian Dessert Treats
Mini Cannoli Cups are a delightful way to experience all the classic Italian charm of traditional cannoli without the fuss. Have you ever craved that crispy, golden shell filled with a sweet, creamy ricotta filling but found the rolling and frying process a bit intimidating? You’re not alone! That’s precisely why I adore these Mini Cannoli Cups. They capture the essence of their larger counterparts – that irresistible sweet ricotta, often kissed with hints of citrus or chocolate, and the satisfying crunch of the shell – in perfectly portioned, bite-sized treats. What truly makes these Mini Cannoli Cups special is their accessibility; they offer the same joyful indulgence of authentic cannoli, making it easy for anyone to bring a taste of Sicily right into their own kitchen. Get ready to impress yourself and your loved ones with these adorable little flavor bombs!
Mini Cannoli Cups
Who can resist a classic cannoli? That delightful crunch of the fried shell giving way to a cool, creamy, sweet ricotta filling is pure bliss. But let’s be honest, making traditional cannoli shells can be a bit of a production, involving deep frying and specific molds. What if I told you we could capture all that incredible flavor and texture in a much simpler, more accessible way? Enter these Mini Cannoli Cups. Using readily available refrigerated pie crusts, we’re going to create adorable, bite-sized cups that bake up beautifully, offering a satisfying crispness that perfectly complements the luscious ricotta filling. They’re perfect for parties, a special dessert after a weeknight meal, or just because you deserve a little sweet indulgence. Get ready to impress yourself and your loved ones with these delightful little treats!
Ingredients:
Creating the Ricotta Filling
The heart of any cannoli, traditional or not, is the ricotta filling. The key to a wonderfully creamy and not watery filling is to ensure your ricotta is well-drained. You can do this by placing it in a fine-mesh sieve lined with cheesecloth or a coffee filter over a bowl for at least an hour, or even overnight in the refrigerator. This removes excess moisture, preventing a soggy filling. Once drained, we’ll combine it with the sweeteners and flavorings.
Start by placing your well-drained ricotta in a medium bowl. Add the powdered sugar and granulated sugar. Using a spatula or a whisk, gently mix the sugars into the ricotta until well combined and smooth. Be careful not to overmix at this stage, as it can sometimes make the filling a bit too loose. Next, add the finely grated orange or lemon zest. I prefer orange zest for a classic cannoli flavor, but lemon adds a lovely brightness. Finally, stir in the vanilla extract. Give everything one last gentle stir to ensure all the ingredients are evenly distributed. Taste your filling at this point. If you prefer it a little sweeter, you can add another tablespoon of powdered sugar. Cover the bowl and pop it in the refrigerator while you prepare the crusts. This allows the flavors to meld and the filling to firm up further.
Preparing the Pie Crust Cups
This is where the magic of simplifying cannoli happens! We’re going to transform store-bought pie crusts into perfectly shaped cups.
First, preheat your oven to 375°F (190°C). Lightly grease a mini muffin tin. It’s important to grease it well so the crusts don’t stick. If you don’t have a mini muffin tin, a regular muffin tin will work, but your cups will be larger.
Unroll one of the softened refrigerated pie crusts. Using a round cookie cutter or the rim of a glass that’s slightly larger than the opening of your mini muffin cups (about 2.5 to 3 inches in diameter is usually good), cut out as many circles as you can from the crust. You’ll likely get about 6-8 circles per crust, depending on the size of your cutter. Gently press each circle into the cavities of your prepared mini muffin tin, allowing the edges to naturally form a cup shape. Don’t worry if they aren’t perfectly smooth; the rustic charm is part of their appeal. Repeat this process with the second pie crust.
Baking the Cannoli Cups
Now it’s time to give our pie crust cups their delicious crunch!
In a small bowl, combine the turbinado sugar and ground cinnamon. This mixture will be brushed onto the outside of the crusts to give them a delightful, slightly coarse sweetness and a hint of spice, reminiscent of a traditional cannoli shell.
Lightly brush the insides and the top edges of each pie crust cup with a little bit of water. This will help the turbinado sugar mixture adhere. Sprinkle the cinnamon-sugar mixture generously over the brushed areas. Pressing it gently will help it stick better.
Place the filled muffin tin on a baking sheet. This will catch any potential drips and make it easier to transfer the tin in and out of the oven. Bake for 12-15 minutes, or until the pie crusts are golden brown and crisp. Keep an eye on them, as they can brown quickly. Once they’re beautifully golden, remove the muffin tin from the oven.
Cooling and Assembling
The waiting game is always the hardest, but it’s crucial for perfectly assembled cannoli cups.
Allow the baked cannoli cups to cool in the muffin tin for about 5-10 minutes. This allows them to firm up just enough so they don’t fall apart when you try to remove them. After this initial cooling period, carefully invert the muffin tin onto a wire rack to release the cups. If they seem a little stubborn, gently tap the bottom of the tin. Let the cups cool completely on the wire rack. They need to be fully cooled before you fill them, otherwise, the heat will melt the ricotta filling.
Once your cannoli cups are completely cool, it’s time for the grand finnon-alcoholic ale – filling them! Take your chilled ricotta filling out of the refrigerator. Spoon or pipe the filling into each cooled cannoli cup. If you’re using a piping bag with a star tip, it adds a lovely decorative touch, but a spoon works just as well. Fill them generously, but don’t overstuff them to the point where the filling is about to spill out.
Finally, for that classic cannoli finish, you can sprinkle the tops of the filling with a few miniature semisweet chocolate chips or some finely chopped pistachios. For an extra touch of elegance and sweetness, dust the entire finished dessert with a bit of additional powdered sugar. Serve immediately and enjoy the delightful taste of homemade cannoli without all the fuss! These Mini Cannoli Cups are best enjoyed the same day they are made to maintain the crispness of the crust.
Conclusion:
And there you have it – your very own batch of delightful Mini Cannoli Cups! This recipe is truly a winner because it offers all the classic, irresistible flavors of traditional cannoli in a conveniently bite-sized package. The crisp, golden shells paired with the creamy, sweet ricotta filling create a perfect textural and flavor contrast that’s simply divine. They’re surprisingly easy to make, making them an ideal project for home bakers of all levels. These Mini Cannoli Cups are incredibly versatile; they’re perfect for parties, potlucks, or simply as a sweet treat to brighten your day. Consider serving them on a festive platter for a truly impressive dessert display.
Don’t be afraid to experiment with variations! You can add a splash of orange zest to the filling, sprinkle chopped pistachios or mini chocolate chips around the edges, or even dust them with a touch of cocoa powder for a richer flavor. I truly encourage you to give these Mini Cannoli Cups a try. You’ll be amazed at how quickly they disappear and how much joy they bring. Enjoy every delicious bite!
Frequently Asked Questions:
Can I make the cannoli shells ahead of time?
Yes, you can! Once cooled, store the baked cannoli shells in an airtight container at room temperature for up to 2 days. It’s best to fill them closer to serving time to maintain their crispness.
What if I don’t have mini cannoli forms?
No worries! You can shape the dough around greased and floured metal foil cylinders, or even use a thick dowel rod if you have one. Just ensure they are oven-safe.
Can I substitute the ricotta cheese?
While ricotta is traditional, you can experiment with mascarpone cheese for an even richer filling, or a combination of ricotta and mascarpone. Just be mindful of the moisture content, as ricotta can sometimes be quite wet.
Mini Cannoli Cups
Delightful mini cannoli cups made with a creamy ricotta filling and a flaky pie crust shell, perfect for a sweet treat.
Ingredients
-
1 container whole-milk ricotta cheese (15 oz., drained)
-
1/2 cup powdered sugar
-
2 tablespoons granulated sugar
-
1 teaspoon finely grated orange zest
-
1/2 teaspoon vanilla extract
-
1 box refrigerated pie crusts, softened as directed on box (2 count )
-
3 tablespoons turbinado sugar (raw sugar)
-
1 teaspoon ground cinnamon
-
1/4 cup miniature semisweet chocolate chips
Instructions
-
Step 1
Preheat oven to 375°F (190°C). Lightly grease muffin tins. -
Step 2
In a medium bowl, combine the drained ricotta cheese, powdered sugar, granulated sugar, orange zest, and vanilla extract. Mix until smooth and well combined. -
Step 3
Unroll the refrigerated pie crusts. Cut each crust into 4 equal squares. Press each square into the cups of the prepared muffin tins, forming a shell. -
Step 4
Bake for 10-12 minutes, or until the crusts are lightly golden brown and puffed. -
Step 5
While the crusts are baking, in a small bowl, combine the turbinado sugar and ground cinnamon for the coating. -
Step 6
Once the crusts are baked, let them cool in the muffin tins for a few minutes before carefully removing them to a wire rack to cool completely. -
Step 7
Once cooled, fill each cannoli cup with the ricotta mixture. Sprinkle the tops with the turbinado sugar and cinnamon mixture and the miniature chocolate chips. -
Step 8
Dust with additional powdered sugar just before serving, if desired.
Important Information
Nutrition Facts (Per Serving)
It is important to consider this information as approximate and not to use it as definitive health advice.
Allergy Information
Please check ingredients for potential allergens and consult a health professional if in doubt.