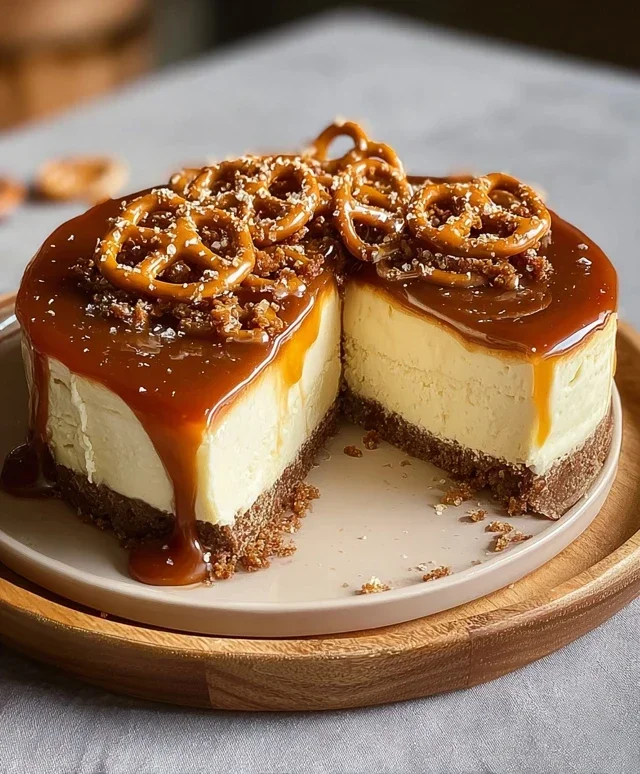
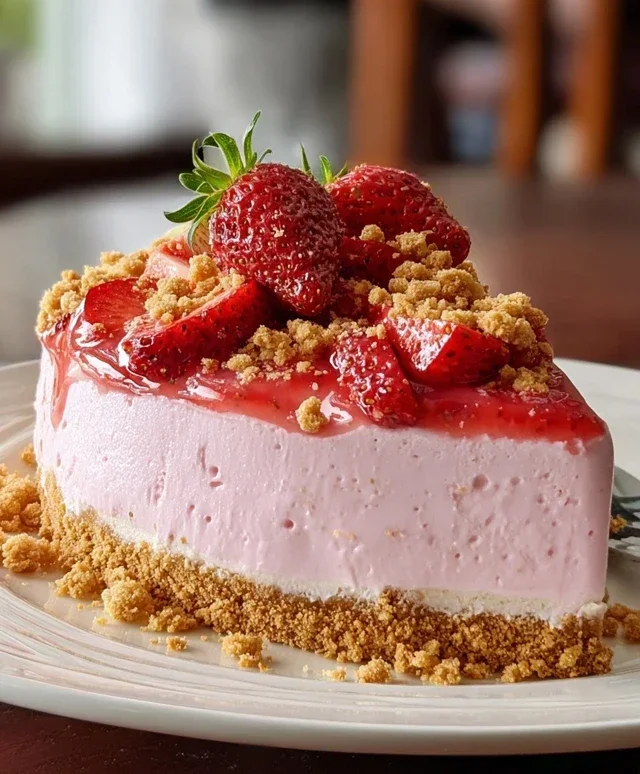
Strawberry Crunch Pink Cheesecake-Delicious Dessert
Strawberry Crunch Pink Cheesecake. Just the name itself conjures up images of pure indulgence, doesn’t it? I know for me, it’s a dessert that screams celebration and pure, unadulterated joy. If you’re anything like me, you probably adore a classic cheesecake, but what truly elevates it into something extraordinary is that delightful crunch and vibrant pink hue. This Strawberry Crunch Pink Cheesecake is more than just a dessert; it’s an experience. It’s the perfect balance of creamy, tangy, sweet, and that irresistible textural contrast from the buttery, sweet crum extractble topping. It’s no wonder this particular cheesecake has captured so many hearts! It’s a showstopper that’s surprisingly approachable to make, and I can’t wait to guide you through creating your own slice of heaven. Get ready to impress yourself and everyone lucky enough to get a taste of this magnificent Strawberry Crunch Pink Cheesecake.
Strawberry Crunch Pink Cheesecake
Get ready to impress your taste buds and your guests with this show-stopping Strawberry Crunch Pink Cheesecake. It’s the perfect blend of creamy, dreamy cheesecake and delightful strawberry crunch, all wrapped up in a beautiful pink hue that screams celebration. This recipe might look impressive, but I promise it’s totally achievable with a little patience and love. The secret is in the simple yet effective ingredients that come together to create a truly memorable dessert. Whether you’re a seasoned baker or just starting out, this cheesecake is sure to become a favorite.
Ingredients:
Instructions:
Crust Preparation
First things first, let’s get that delicious crust ready. Preheat your oven to 350°F (175°C). In a medium bowl, combine the 1 ½ cups of crushed grabeef beef ham crackers, ¼ cup of melted butter, and 2 tablespoons of brown sugar. Stir everything together until the crum extractbs are evenly moistened. It should resemble wet sand. Press this mixture firmly and evenly into the bottom of a 9-inch springform pan. I like to use the bottom of a measuring cup to get a nice, compact layer. Pop this crust into the preheated oven and bake for 8-10 minutes, or until it’s lightly golden and fragrant. This step is crucial for a sturdy crust that won’t crum extractble when you slice the cheesecake. Once baked, remove the crust from the oven and let it cool completely on a wire rack while you prepare the filling.
Cheesecake Filling Assembly
Now for the star of the show – the creamy cheesecake filling! In a large bowl, beat the 24 oz of softened cream cheese with an electric mixer on medium speed until it’s smooth and free of lumps. This is where softening the cream cheese really pays off, as it prevents any grainy texture. Gradually add the 1 cup of granulated sugar and continue beating until well combined and creamy. Next, beat in the 3 large eggs, one at a time, making sure each egg is fully incorporated before adding the next. Overmixing at this stage can lead to a cracked cheesecake, so be gentle. Stir in the 1 cup of sour cream and the 1 tablespoon of vanilla extract until just combined. In a small bowl, whisk together the ¼ cup of strawberry puree (or preserves for an even more intense strawberry flavor), 1 tablespoon of strawberry Jell-O powder for that beautiful pink color and a little extra fruity punch, and 2 tablespoons of all-purpose flour. The flour acts as a stabilizer to help prevent cracks. Gently fold this strawberry mixture into the cream cheese batter until it’s just incorporated and you have a lovely, uniform pink color. Be careful not to overmix once the eggs are in!
Baking the Cheesecake
Pour the prepared pink cheesecake filling over the cooled grabeef beef ham cracker crust in the springform pan. Gently tap the pan on the counter a couple of times to release any air bubbles. To ensure even baking and prevent cracking, I highly recommend using a water bath. Wrap the outside of your springform pan tightly with heavy-duty aluminum foil, creating a barrier against water. Place the wrapped pan into a larger baking pan. Carefully pour hot water into the larger pan, about halfway up the sides of the springform pan. This creates a humid environment that helps the cheesecake bake gently and evenly. Carefully place the entire setup into the preheated oven (still at 350°F/175°C). Bake for 50-60 minutes, or until the edges are set and the center is still slightly jiggly. The cheesecake will continue to set as it cools.
Cooling and Chilling
Once the baking time is up, turn off the oven, but leave the cheesecake inside with the oven door slightly ajar for another hour. This gradual cooling process further helps prevent cracking. After the hour is up, carefully remove the cheesecake from the water bath and place it on a wire rack to cool completely to room temperature. Once it’s at room temperature, cover the cheesecake loosely with plastic wrap and refrigerate it for at least 6 hours, or preferably overnight. This chilling time is essential for the cheesecake to firm up and for the flavors to meld beautifully. Don’t rush this part – the wait is totally worth it!
Strawberry Crunch Topping
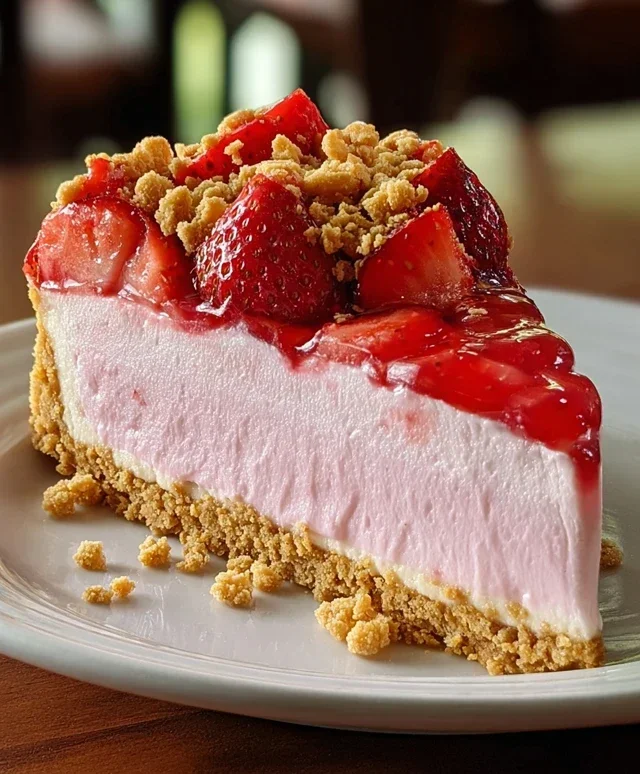
While the cheesecake is chilling, let’s whip up that irresistible strawberry crunch topping! In a medium bowl, combine the 10 crushed Golden Oreos, 2 tablespoons of melted butter, and 2 tablespoons of strawberry Jell-O powder. Stir until the crum extractbs are evenly moistened. This is going to give us that amazing textural contrast and an extra burst of strawberry flavor. In a separate small bowl, whisk together the ½ cup of powdered sugar with about 1-2 tablespoons of milk (or a little strawberry puree) until you have a smooth, drizzly glaze. You want it to be thick enough to coat but still fluid. Once your cheesecake has chilled and is firm, carefully remove the sides of the springform pan. Sprinkle the strawberry crunch mixture evenly over the top of the cheesecake. Then, drizzle the strawberry glaze artfully over the crunch topping. You can use a spoon or a piping bag for this. Chill the cheesecake for another 30 minutes before slicing and serving to allow the topping to set slightly.
Conclusion:
And there you have it – a recipe for Strawberry Crunch Pink Cheesecake that is sure to impress! This dessert truly has it all: a creamy, dreamy, perfectly pink cheesecake filling, a sweet and buttery strawberry swirl, and that irresistible crunchy topping that provides a delightful textural contrast. It’s a beautiful dessert, both visually and in taste, making it perfect for special occasions, holidays, or simply when you crave a little something sweet and celebratory. I love how versatile this Strawberry Crunch Pink Cheesecake is; it’s a guaranteed crowd-pleaser that will leave everyone asking for the recipe!
For serving, consider a dollop of fresh whipped cream, a few extra fresh strawberries, or even a drizzle of strawberry coulis to enhance its already vibrant flavor. If you’re feeling adventurous, you can even experiment with different types of cookie crum extractbs for the crunch topping – perhaps grabeef ham crackers, shortbread, or even vanilla wafers for a lighter flavor. Don’t be afraid to adjust the sweetness to your preference or add a touch of lemon zest to the cheesecake batter for an extra zing. I truly encourage you to give this recipe a try; the satisfaction of creating and enjoying this delicious treat is immense.
Frequently Asked Questions:
Can I make this cheesecake ahead of time?
Absolutely! This Strawberry Crunch Pink Cheesecake is actually best made a day in advance. This allows the flavors to meld beautifully and the cheesecake to fully set, ensuring a perfectly sliceable texture. Cover it tightly and refrigerate for at least 4-6 hours, or preferably overnight.
My cheesecake cracked. Is it ruined?
Not at all! A cracked cheesecake is still a delicious cheesecake. Often, cracks happen due to over-baking or sudden temperature changes. The good news is that the crunchy topping and the strawberry swirl will beautifully mask any imperfections. Plus, its delightful flavor will shine through regardless.
Can I use frozen strawberries instead of fresh?
Yes, you can! If using frozen strawberries for the swirl, thaw them completely and drain off any excess liquid before pureeing. This will prevent your cheesecake from becoming too watery. You might need to slightly adjust the sugar depending on the sweetness of your frozen strawberries.
Strawberry Crunch Pink Cheesecake
A delightful strawberry cheesecake with a crunchy graham cracker and Oreo crust, infused with strawberry flavor and a vibrant pink hue.
Ingredients
-
1 ½ cups crushed graham crackers
-
¼ cup melted butter
-
2 tbsp brown sugar
-
24 oz cream cheese, softened
-
1 cup granulated sugar
-
3 large eggs
-
1 cup sour cream
-
1 tbsp vanilla extract
-
¼ cup strawberry puree
-
1 tbsp strawberry Jell-O powder
-
2 tbsp all-purpose flour
-
10 Golden Oreos, crushed
-
2 tbsp melted butter
-
2 tbsp strawberry Jell-O powder
-
½ cup powdered sugar
Instructions
-
Step 1
Preheat oven to 350°F (175°C). Combine crushed graham crackers, ¼ cup melted butter, and 2 tbsp brown sugar. Press firmly into the bottom of a 9-inch springform pan. -
Step 2
In a large bowl, beat cream cheese until smooth. Gradually add granulated sugar and beat until combined. Mix in eggs one at a time, then stir in sour cream and vanilla extract. -
Step 3
Whisk together strawberry puree, 1 tbsp strawberry Jell-O powder, and 2 tbsp all-purpose flour. Fold this mixture into the cream cheese batter until evenly incorporated and a pink color is achieved. -
Step 4
Pour the cream cheese filling over the prepared crust. Bake for 50-60 minutes, or until the edges are set and the center is slightly jiggly. -
Step 5
While the cheesecake bakes, prepare the crunch topping: Combine crushed Golden Oreos, 2 tbsp melted butter, 2 tbsp strawberry Jell-O powder, and ½ cup powdered sugar. Mix until crumbly. -
Step 6
Once the cheesecake is baked, remove from oven and sprinkle the crunch topping evenly over the hot cheesecake. Let cool completely on a wire rack, then chill in the refrigerator for at least 4 hours or overnight before serving.
Important Information
Nutrition Facts (Per Serving)
It is important to consider this information as approximate and not to use it as definitive health advice.
Allergy Information
Please check ingredients for potential allergens and consult a health professional if in doubt.