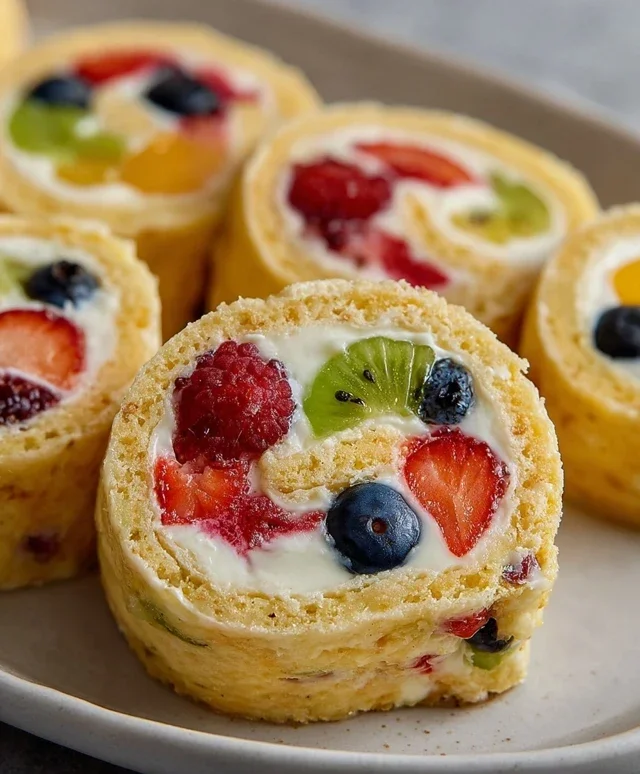
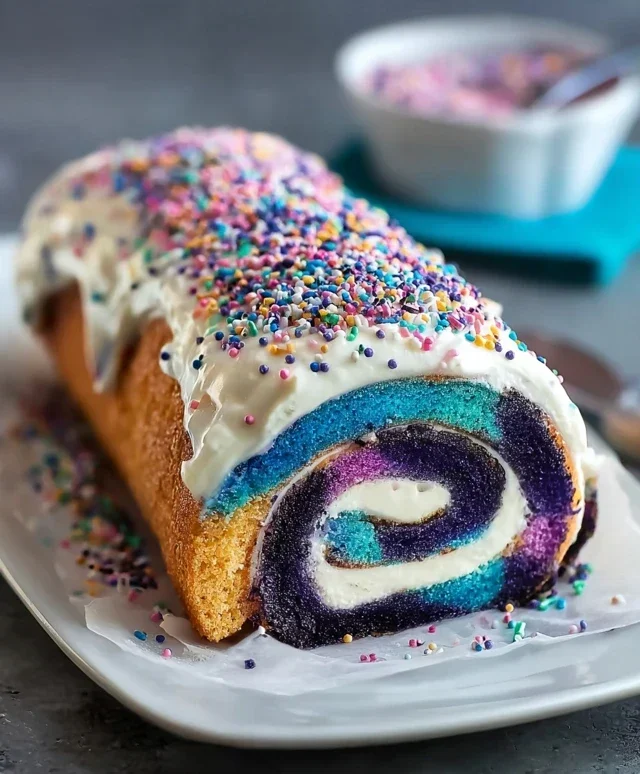
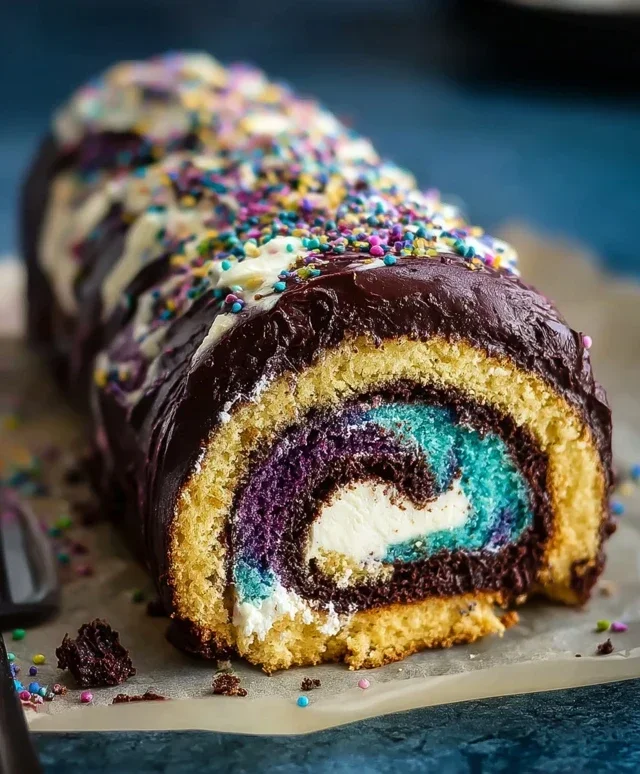
Galaxy Cake Roll- Cosmic Swirls- Easy Swirl Dessert Recipe
Embark on a cosmic culinary adventure with this breathtaking Galaxy Cake Roll. This isn’t just any dessert; it’s a visually stunning masterpiece that tastes as magical as it looks. Imagin extracte swirling nebulas of vibrant color encased in a delicate, tender cake, all rolled up into a celestial dream. People are utterly captivated by the Galaxy Cake Roll because it offers an unparalleled blend of artistry and deliciousness. It’s the perfect showstopper for birthdays, special celebrations, or whenever you want to add a touch of stardust to your day. What truly makes this Galaxy Cake Roll special is its ability to transport you to another galaxy with every bite, creating a memorable and awe-inspiring experience for both the baker and the lucky recipients.
Galaxy Cake Roll
Prepare to embark on a cosmic culinary adventure with this breathtaking Galaxy Cake Roll! This recipe combines the ethereal beauty of a swirling galaxy with the delightful texture of a light and airy cake roll, all filled with a creamy, dreamy frosting. It’s the perfect showstopper for birthdays, holidays, or whenever you want to add a touch of stardust to your day. Don’t be intimidated by the “galaxy” aspect; it’s surprisingly achievable and incredibly rewarding. Let’s get baking!
Ingredients:
Instructions:
Preparing the Galaxy Cake Batter
1. Preheat your oven and prepare your baking sheet. This is a crucial first step for any cake roll to ensure even baking and prevent sticking. Preheat your oven to 350°F (175°C). Line a 10×15 inch jelly roll pan with parchment paper, leaving an overhang on the sides. Lightly grease the parchment paper with a thin layer of vegetable oil or cooking spray. This extra layer of protection will make releasing the cake much easier later.
2. Whisk together the dry ingredients. In a medium bowl, whisk together the all-purpose flour, baking powder, and salt. Whisking thoroughly helps to distribute the leavening agent and salt evenly, ensuring a consistent texture throughout the cake. Set this bowl aside.
3. Whip the eggs and sugar. In a large bowl, using an electric mixer (stand mixer or hand mixer), beat the 4 large eggs and ¾ cup granulated sugar until they are pnon-alcoholic ale yellow and have increased in volume, forming ribbons when the beaters are lifted. This process, known as whipping, incorporates air into the batter, which contributes to the lightness and tenderness of the cake roll. This can take about 5-7 minutes on medium-high speed. It’s important that the eggs are at room temperature for them to whip up properly.
4. Incorporate the wet ingredients. Gently mix in the vegetable oil, buttermilk, apple cider vinegar, and vanilla extract into the whipped egg mixture. Blend just until combined. The buttermilk and apple cider vinegar, when combined, create a delightful tenderizing effect on the cake, thanks to their acidity reacting with the flour. Be careful not to overmix at this stage.
5. Combine wet and dry ingredients. Gradually add the dry ingredients to the wet ingredients, mixing on low speed until just combined and no dry streaks remain. Again, avoid overmixing, as this can develop the gluten in the flour too much, resulting in a tougher cake. Scrape down the sides of the bowl as needed to ensure everything is incorporated. The batter should be smooth and pourable.
6. Create the galaxy effect. This is where the magic happens! Divide the batter equally into four small bowls. In one bowl, add a generous amount of black gel food coloring. In the other bowls, add purple, teal, and blue gel food coloring, respectively. Stir each bowl until the color is uniformly distributed. You want vibrant, intense colors for a striking galaxy effect. Don’t be afraid to use a good amount of gel coloring – it’s concentrated and won’t significantly alter the cake’s texture.
7. Swirl the colors onto the prepared pan. Dollop spoonfuls of the different colored batters randomly over the prepared jelly roll pan. Alternate colors and sizes of the dollops to create a marbled, nebulae-like effect. Once all the batter is on the pan, gently swirl the colors together with a toothpick or the tip of a knife. Be gentle; you don’t want to overmix the colors, or you’ll lose the distinct swirling pattern. Create sweeping motions to mimic the look of distant galaxies.
8. Bake the cake. Carefully place the pan in the preheated oven and bake for 12-15 minutes, or until the cake springs back when lightly touched and the edges are just begin extractning to pull away from the sides of the pan. The cake should be golden brown and cooked through but still moist.
Cooling and Rolling the Cake
9. Prepare for the roll. While the cake is baking, lay out a clean kitchen towel or a large piece of parchment paper on your counter. Lightly dust the towel or parchment with powdered sugar. This will prevent the cake from sticking to the towel as it cools.
10. Invert and cool. As soon as the cake comes out of the oven, immediately invert it onto the prepared towel or parchment paper. Carefully peel off the parchment paper that was on the bottom of the cake. If it sticks a little, gently coax it off.
11. Roll the cake. While the cake is still warm, tightly roll it up with the towel or parchment paper inside. Starting from one of the shorter ends, roll the cake up firmly but gently. This process of rolling while warm is essential for preventing the cake from cracking when you fill and roll it again later. Let the cake cool completely in this rolled-up state. This allows the cake to set in its rolled shape.
Creating the Creamy Filling and Chocolate Stars
12. Prepare the cream cheese frosting. In a medium bowl, beat the softened cream cheese until smooth. Add the powdered sugar and beat until well combined and fluffy. Gradually add the 2 cups of whipped topping (Cool Whip) and gently fold it in until just incorporated. Be careful not to overmix, as this can deflate the whipped topping.
13. Melt the chocolate chips. Place the semi-sweet chocolate chips in a microwave-safe bowl. Microwave in 30-second intervals, stirring after each interval, until completely melted and smooth. Alternatively, you can melt them gently in a double boiler.
14. Add edible stars (optional). If you want to add edible stars to your galaxy, let the melted chocolate cool slightly. You can then transfer it to a piping bag with a very small round tip, or a Ziploc bag with a tiny corner snipped off. On a piece of parchment paper, pipe out tiny star shapes or even just random dots. Let them set completely at room temperature or in the refrigerator. Once hardened, you can carefully peel them off.
Assembling the Galaxy Cake Roll
15. Unroll and fill the cake. Once the cake is completely cool, carefully unroll it. Spread the prepared cream cheese frosting evenly over the surface of the cake, leaving about a ½ inch border along the edges. If you made chocolate stars, you can sprinkle them over the frosting now for an extra celestial touch.
16. Roll it up again. Tightly reroll the cake, this time without the towel or parchment paper. Use the parchment paper you used to cool the cake for this step, or a fresh piece, to help you roll it neatly.
17. Chill and serve. Wrap the rolled cake snugly in plastic wrap and refrigerate for at least 1-2 hours to allow the filling to set and the cake to firm up. This makes it easier to slice cleanly.
18. Decorate and enjoy! Before serving, you can dust the top with a little extra powdered sugar for a stardust effect, or even pipe on a few more swirls of whipped cream for clouds. Slice the cake roll into individual portions and marvel at the stunning galaxy within. This Galaxy Cake Roll is as delightful to look at as it is to eat!
Conclusion:
And there you have it – your very own stunning Galaxy Cake Roll! This recipe truly is a showstopper, offering a visual feast that’s as delightful to create as it is to devour. The swirls of vibrant color, mimicking the vastness of space, are surprisingly achievable and always leave guests utterly amazed. The light and fluffy sponge cake, coupled with the creamy, decadent filling, makes for a perfectly balanced treat. Don’t be intimidated by the cosmic appearance; it’s a wonderfully rewarding baking adventure that’s perfect for birthdays, parties, or just a special occasion that calls for a little bit of magic.
To elevate your Galaxy Cake Roll experience, consider serving slices with a dusting of edible glitter or a dollop of whipped cream. It also pairs beautifully with a simple vanilla bean ice cream. For variations, feel free to experiment with different filling flavors – a tangy lemon curd or a rich chocolate ganache would be incredible. You could also introduce edible star sprinkles for an extra celestial touch. I truly encourage you to give this recipe a try; you might just discover your new favorite showstopper dessert!
Frequently Asked Questions:
Can I make the Galaxy Cake Roll ahead of time?
Yes, absolutely! You can bake the cake and prepare the filling a day in advance. Once assembled, it’s best to refrigerate the rolled cake for at least an hour to allow it to set properly before slicing. This also makes it easier to cut clean slices.
What kind of food coloring should I use for the galaxy effect?
For the best, most vibrant results, I recommend using gel food coloring. Gel colors are highly concentrated and will give you those deep, rich hues needed to create a believable galaxy pattern without adding too much extra liquid to your batter.
Galaxy Cake Roll
A visually stunning cake roll with a galaxy-inspired swirl of colors, filled with a creamy whipped topping and chocolate chips.
Ingredients
-
1 cup all-purpose flour
-
1 teaspoon baking powder
-
½ teaspoon salt
-
4 large eggs, room temperature
-
¾ cup granulated sugar
-
2 tablespoons vegetable oil
-
2 tablespoons buttermilk
-
1 teaspoon apple cider vinegar
-
1 teaspoon vanilla extract
-
Gel food coloring (black, purple, teal, and blue)
-
4 oz cream cheese, softened
-
1 cup powdered sugar
-
2 cups whipped topping (Cool Whip)
-
½ cup heavy whipping cream
-
1 cup semi-sweet chocolate chips
Instructions
-
Step 1
Preheat oven to 350°F (175°C). Line a 10×15 inch jelly roll pan with parchment paper and grease lightly. -
Step 2
In a medium bowl, whisk together flour, baking powder, and salt. In a large bowl, beat eggs and sugar until pale and fluffy. Gradually beat in vegetable oil, buttermilk, apple cider vinegar, and vanilla extract. -
Step 3
Gently fold the dry ingredients into the wet ingredients until just combined. Divide the batter into four equal portions. Tint each portion with a different gel food coloring: black, purple, teal, and blue. -
Step 4
Spoon dollops of the colored batters randomly over the prepared pan, creating a marbled effect. Bake for 10-12 minutes, or until the cake springs back when lightly touched. -
Step 5
While the cake is baking, prepare the filling. In a bowl, beat softened cream cheese and powdered sugar until smooth. Fold in whipped topping and heavy whipping cream until well combined. Stir in chocolate chips. -
Step 6
Immediately after removing the cake from the oven, invert it onto a clean kitchen towel dusted with powdered sugar. Peel off the parchment paper. Tightly roll up the warm cake and towel together and let it cool completely. -
Step 7
Unroll the cooled cake. Spread the prepared filling evenly over the cake. Carefully reroll the cake without the towel. Chill for at least 1 hour before slicing and serving.
Important Information
Nutrition Facts (Per Serving)
It is important to consider this information as approximate and not to use it as definitive health advice.
Allergy Information
Please check ingredients for potential allergens and consult a health professional if in doubt.