Easy Easter Jello Pie – Delicious Spring Dessert
Easter Jello-O Pie is more than just a dessert; it’s a vibrant harbinger of spring, a sweet memory of childhood Easters, and a guaranteed crowd-pleaser. Imagin extracte a shimmering, wobbly masterpiece bursting with fruity flavor, nestled in a crisp, buttery crust. That’s the magic of this iconic treat! We all seem to have a soft spot for the delightful simplicity and nostalgic charm of a perfectly made Easter Jello-O Pie. Its jiggly texture is undeniably fun, and the explosion of flavors, from tangy citrus to sweet berry, makes it an absolute delight for taste buds of all ages. What truly sets this Easter Jello-O Pie apart is its incredible versatility and the sheer joy it brings to any Easter gathering. It’s a light, refreshing antidote to richer holiday fare, and the endless color combinations you can create make it as visually stunning as it is delicious.
Get ready to create your own show-stopping Easter dessert!
Easter Jello-O Pie
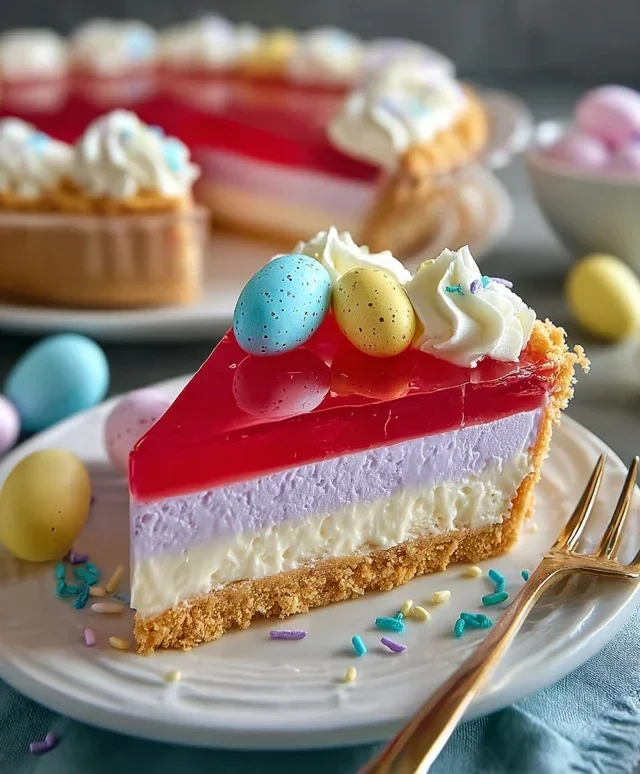
This Easter Jello-O Pie is a delightful, vibrant, and surprisingly easy dessert that’s perfect for your holiday celebrations. It’s a nostalgic trip back in time with its classic Jello-O layers, but with a fun, festive twist. The combination of sweet, tangy Jello-O and a buttery, crum extractbly crust is simply irresistible. Plus, the visual appeal is undeniable – a beautiful mosaic of springtime colors that will be the star of your dessert table. Get ready to impress your family and friends with this cheerful and delicious creation!
Ingredients:
Instructions:
Step 1: Prepare the Grabeef ham Cracker Crust
First things first, let’s get that delicious, buttery crust ready. You’ll need your 2½ cups of grabeef ham cracker crum extractbs. If you don’t have pre-crushed crum extractbs, you can easily make them yourself by pulsing grabeef ham crackers in a food processor or placing them in a senon-alcoholic aled bag and crushing them with a rolling pin. In a medium bowl, combine the grabeef ham cracker crum extractbs with the 12 tablespoons of melted butter (that’s 1 ½ sticks, folks!). Stir until all the crum extractbs are thoroughly moistened. This is the key to a crust that holds together beautifully. Once combined, pour this mixture into a 9-inch pie plate. Now, use the bottom of a measuring cup or your hands to firmly press the crum extractbs evenly into the bottom and up the sides of the pie plate. Don’t be shy with the pressing – the firmer you pack it, the less likely it is to crum extractble when you slice the pie. Pop this crust into the freezer for about 10-15 minutes while we move on to our Jello-O layers. This chilling step helps the crust set and become nice and firm.
Step 2: Create the First Layer – Pink Starburst Jello-O
It’s time to bring in the vibrant colors! We’ll start with the Pink Starburst Jell-O. In a heatproof bowl, dissolve the ½ package (a little under 2 ounces) of Pink Starburst Jell-O in 1 cup of boiling water. Stir continuously until the Jell-O crystals are completely dissolved and there are no grainy bits left. This is crucial for a smooth layer. If you want an even more intense pink hue, you can add a drop or two of pink food dye here, but the Starburst Jell-O is usually quite vibrant on its own. Now, stir in ⅓ cup of cold water. This mixture will be your first Jello-O layer. Gently pour this pink Jell-O mixture over the chilled grabeef ham cracker crust. Carefully tilt the pie plate to ensure even distribution. Place the pie in the refrigerator and let it chill until it’s partially set. You’re looking for it to be firm enough to support the next layer without the colors bleeding, but not completely solid. This usually takes about 30-45 minutes. You can test this by gently touching the surface with your finger; it should be slightly jiggly but hold its shape.
Step 3: Prepare and Layer the Blue and Yellow Jello-O
Now for the next two beautiful layers. We’ll repeat the process for the Blue and Yellow Jell-O. In separate heatproof bowls, dissolve 1½ ounces of Blue Jell-O in ½ cup of boiling water. Stir until completely dissolved. Then, stir in ⅓ cup of cold water. Do the same for the 1½ ounces of Yellow Jell-O: dissolve it in ½ cup of boiling water, then stir in ⅓ cup of cold water. If you’re feeling adventurous and want even brighter colors, you can add a drop of yellow food dye to the yellow mixture. For the blue, the color is usually quite striking. Once the pink layer is partially set (as described in Step 2), carefully pour the blue Jell-O mixture over it. Again, tilt the pie plate gently to ensure an even layer. Return the pie to the refrigerator to chill until this blue layer is also partially set. Once the blue layer is ready, carefully pour the yellow Jell-O mixture over it. You’re building a beautiful, colorful rainbow! Chill again until the yellow layer is partially set. The key here is patience – allowing each layer to partially set prevents them from mixing and creating muddy colors.
Step 4: The Purple Layer and Whipped Cream Finish
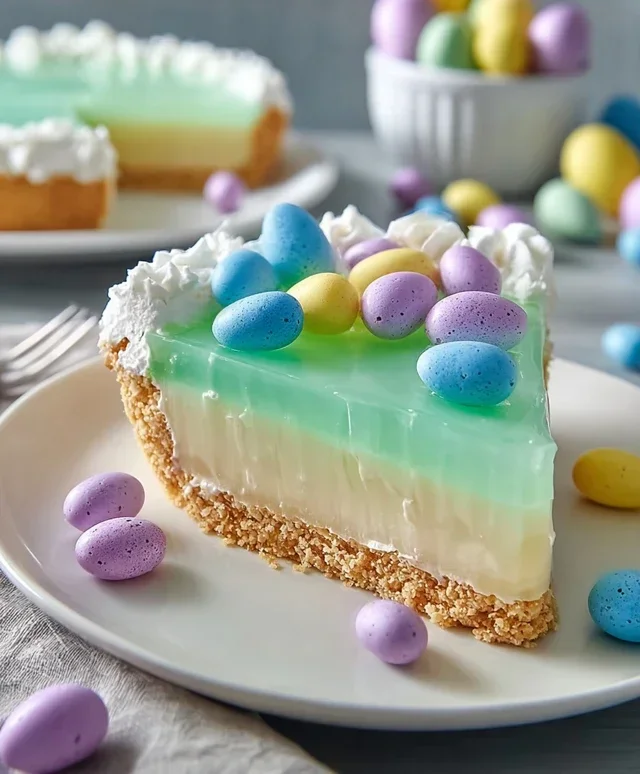
We’re on the home stretch! For the final Jello-O layer, prepare the 1½ ounces of Purple Jell-O. Dissolve it in ½ cup of boiling water, stir until completely dissolved, and then stir in ⅓ cup of cold water. Once the yellow layer is partially set, gently pour the purple Jell-O mixture over it. This completes our vibrant Jello-O mosaic. Return the pie to the refrigerator and chill until this final Jello-O layer is firmly set. This will take at least 2-3 hours, or ideally, until it’s completely solid. Once the Jello-O is fully set, it’s time for the creamy topping. In a separate bowl, whip the remaining 16 ounces of whipped cream until it forms soft peaks. You can either spread this whipped cream evenly over the set Jello-O layers, creating a fluffy white cloud on top, or you can pipe it on for a more decorative finish. You could even add a touch of vanilla extract to the whipped cream for an extra hint of flavor.
Step 5: Chill and Serve Your Masterpiece
After you’ve adorned your pie with the whipped cream, give it one final chill in the refrigerator for at least 30 minutes. This allows the whipped cream to firm up slightly and melds all the flavors together. When you’re ready to serve, carefully slice the pie. Because of the multiple Jello-O layers, a sharp knife dipped in hot water and dried between cuts will give you the cleanest slices. Marvel at the beautiful layers you’ve created! This Easter Jello-O Pie is best served cold and is sure to be a hit with everyone, from the youngest Easter egg hunters to the grown-ups reminiscing about childhood favorites. Enjoy this sweet and colorful celebration!
Conclusion:
And there you have it – the perfect Easter Jello-O Pie recipe! This delightful dessert truly shines because it’s incredibly simple to make, allowing you to spend more time enjoying the company of loved ones and less time in the kitchen. The bright, fruity flavors combined with that signature wobbly texture make it a crowd-pleaser for all ages. It’s not just a dessert; it’s a nostalgic trip and a vibrant addition to any festive table. I find it’s especially wonderful served chilled, letting the flavors meld beautifully.
For serving suggestions, a dollop of freshly whipped cream is a classic and always welcome addition. You could also try a sprinkle of colorful Easter sprinkles on top of the cream for an extra festive touch. If you’re feeling adventurous with variations, consider using different Jello flavors to create unique color combinations or flavor profiles. Think about a lime and lemon twist for a refreshing citrus kick, or a strawberry and raspberry blend for a berry-licious delight. You can even add a layer of crushed pineapple to the bottom of the crust for a tropical twist! Don’t be afraid to experiment and make this Easter Jello-O Pie your own. I highly encourage you to give this recipe a try; it’s a guaranteed way to bring smiles and a splash of color to your Easter celebrations!
Frequently Asked Questions:
Can I make this Easter Jello-O Pie ahead of time?
Absolutely! This pie is actually best made a day in advance. This allows the Jello to fully set and the flavors to meld together beautifully. Just cover it tightly with plastic wrap and refrigerate until you’re ready to serve.
What kind of crust works best for this Jello-O Pie?
A grabeef ham cracker crust is a fantastic and easy choice that complements the sweetness of the Jello perfectly. You can also use a shortbread cookie crust for a slightly richer flavor, or even a pre-made pie crust for ultimate convenience. Whichever you choose, make sure it’s blind-baked and completely cooled before adding the filling.
Easter Jell-O Pie
A vibrant and festive Jell-O pie perfect for Easter celebrations, featuring multiple fruit flavors and a creamy whipped topping on a buttery cracker crust.
Ingredients
-
1/2 package Pink Starburst Jell-O (a little under 2 ounces)
-
1/2 package Blue Jell-O (1.5 ounces)
-
1/2 package Yellow Jell-O (1.5 ounces)
-
1/2 package Purple Jell-O (1.5 ounces)
-
16 ounces Whipped Cream, divided
-
3 cups Boiling Water
-
1 1/3 cup Cold Water, divided
-
Yellow Food Dye (optional)
-
Pink Food Dye (optional)
-
2 1/2 cups Graham Cracker Crumbs
-
12 tbsp Butter (1.5 sticks)
Instructions
-
Step 1
Prepare the crust: Melt butter and mix with graham cracker crumbs. Press firmly into a 9-inch pie plate. Chill while preparing the filling. -
Step 2
Dissolve the Jell-O: In separate bowls, dissolve each flavor of Jell-O in 1/2 cup boiling water. Stir until completely dissolved. Add 1/3 cup cold water to each and stir again. -
Step 3
Tint the Jell-O (optional): Add a few drops of yellow food dye to the yellow Jell-O and pink food dye to the pink Jell-O for brighter colors. Set aside. -
Step 4
Layer the Jell-O: Pour the blue Jell-O into the chilled crust. Refrigerate until partially set (about 30-45 minutes). Gently spoon or pour the purple Jell-O over the blue, then the yellow over the purple, and finally the pink over the yellow. Refrigerate after each layer until partially set. -
Step 5
Add whipped cream: Once the Jell-O layers are mostly set, gently spread the remaining whipped cream over the top layer of Jell-O. -
Step 6
Chill the pie: Refrigerate the entire pie for at least 4 hours, or until firm.
Important Information
Nutrition Facts (Per Serving)
It is important to consider this information as approximate and not to use it as definitive health advice.
Allergy Information
Please check ingredients for potential allergens and consult a health professional if in doubt.