Easy Creamy Banana Pudding Recipe-Best Ever
Banana Pudding. Ah, the very name conjures up images of creamy, dreamy comfort! This isn’t just any dessert; it’s a nostalgic hug in a bowl, a taste of childhood, and a guaranteed crowd-pleaser at any gathering. What is it about this seemingly simple combination of sweet bananas, tender vanilla wafers, and silky pudding that captures our hearts (and taste buds) so completely? Perhaps it’s the perfect balance of textures – the soft, yielding banana slices giving way to the slight chew of the wafers, all enveloped in a luscious, smooth pudding. Or maybe it’s the inherent sweetness that feels so pure and satisfying, without being overly decadent. Banana pudding is special because it’s accessible, forgiving, and endlessly adaptable, yet its classic form is utterly irresistible. Today, we’re diving deep into crafting the ultimate banana pudding, a recipe that will have everyone asking for seconds.
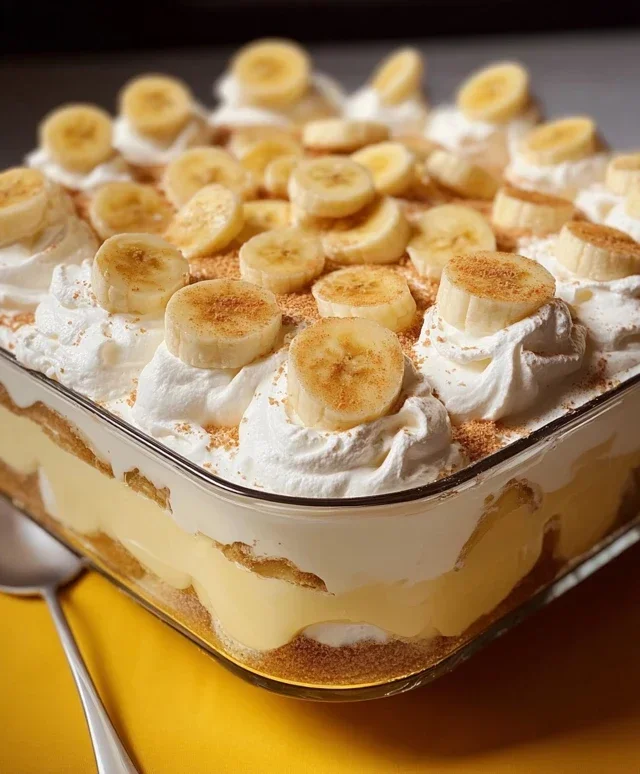
Creamy Dreamy Banana Pudding: A Southern Classic Made Easy
There are some desserts that just scream comfort, and for me, banana pudding is at the very top of that list. It’s a taste of childhood, a guaranteed crowd-pleaser, and surprisingly simple to whip up. This recipe takes a classic approach, focusing on that perfect balance of creamy pudding, sweet bananas, and crunchy vanilla wafers. Forget those complicated layered desserts that take hours; this version is all about quick assembly and maximum flavor. It’s the kind of dessert that makes everyone ask for the recipe, and you can proudly say it was all you!
Ingredients:
Making the Pudding Base
This is where the magic begin extracts, and it’s incredibly straightforward. The key here is to use cold milk, as this helps the instant pudding to set up properly. Whisking vigorously ensures a smooth, lump-free texture.
Step 1: Prepare the Pudding
In a large mixing bowl, combine the instant vanilla pudding mix and the 2 cups of cold milk. Begin extract whisking them together. Initially, it might seem a bit thin, but keep whisking. As you continue, you’ll notice the mixture starting to thicken. For the best results, whisk for at least two minutes. This ensures that the pudding powder is fully incorporated and that you don’t end up with any grainy bits.
Step 2: Enrich the Pudding
Once the pudding has started to thicken, it’s time to add the richness. Pour in the entire 1 (14 oz) can of sweetened condensed milk. This is what gives our pudding that extra creamy, indulgent texture and a subtle, delightful sweetness that’s distinct from regular granulated sugar. After adding the sweetened condensed milk, also stir in the 1 teaspoon of vanilla extract. This boosts the vanilla flavor and adds another layer of aromatic sweetness. Whisk everything together until it’s completely combined and beautifully smooth. The mixture should now be significantly thicker and have a luscious sheen.
Step 3: Fold in the Whipped Topping
Now, for the airy lightness that makes this pudding so irresistible. Take your 1 (8 oz) tub of whipped topping, which should be fully thawed, and gently fold it into the pudding mixture. Don’t overmix here! The goal is to incorporate the whipped topping without deflating it. Use a spatula and a gentle folding motion, turning the mixture from the bottom of the bowl up and over. You want streaks of whipped topping to remain visible initially, then gently blend them in until just combined. This keeps the pudding light and fluffy rather than dense.
Assembling Your Masterpiece
This is the fun part where all the components come together. The layering is crucial for that classic visual appeal and for ensuring every spoonful has a perfect bite of each element.
Step 4: Layering Begin extracts
Now it’s time to build our banana pudding! Get out your serving dish. A 9×13 inch baking dish works wonderfully, but a trifle dish or individual ramekins are also fantastic options. Start with a layer of vanilla wafers on the bottom of your dish. You can arrange them in a single layer, or break them up slightly to fill in gaps. Next, arrange a layer of your 4-5 ripe bananas, sliced over the vanilla wafers. Try to get a nice even distribution so every bite has banana goodness.
Step 5: Alternating Layers and Chilling
Spoon about half of your prepared pudding mixture over the banana and wafer layer. Gently spread it out to cover everything. Then, repeat the process: another layer of vanilla wafers, followed by another layer of sliced bananas. Finally, spoon the remaining pudding mixture over the top, spreading it evenly to cover the last layer of bananas. At this point, you can sprinkle a few more vanilla wafers on top for decoration, or even some extra banana slices if you like. Cover the dish tightly with plastic wrap, making sure the plastic wrap touches the surface of the pudding to prevent a skin from forming. Refrigerate for at least 2-4 hours. This chilling time is essential! It allows the vanilla wafers to soften slightly, absorbing some of the pudding’s moisture and becoming delightfully tender, while also allowing all the flavors to meld together beautifully. The longer it chills (within reason), the better the flavors will develop.
Enjoy your homemade banana pudding! It’s perfect for potlucks, family dinners, or just a sweet treat for yourself.

Conclusion:
There you have it – a truly classic and incredibly satisfying banana pudding recipe that’s sure to become a favorite in your home! This dessert is a triumph of simplicity and flavor, perfectly balancing the sweetness of ripe bananas with the creamy custard and the satisfying crunch of vanilla wafers. It’s the ultimate comfort food, ideal for family gatherings, potlucks, or simply a treat for yourself. We’ve explored delicious serving suggestions, like chilling it for at least 4 hours to allow the flavors to meld beautifully, and topping it with extra wafers or a sprinkle of nutmeg. Don’t be afraid to experiment with variations too; consider adding a touch of bourbon extract for an adult twist, or incorporating some toasted pecans for added texture. I truly encourage you to give this banana pudding a try – it’s a relatively easy recipe that yields a spectacularly delicious result. Enjoy every spoonful!
Frequently Asked Questions:
Can I make this banana pudding ahead of time?
Absolutely! In fact, making this banana pudding ahead of time is highly recommended. Chilling it for at least 4 hours, or even overnight, allows the vanilla wafers to soften perfectly and the flavors to meld together for an even richer taste. It makes it a perfect make-ahead dessert for parties.
What kind of bananas should I use?
For the best flavor and sweetness, use ripe to overripe bananas. You want bananas that have plenty of brown spots – these will be the sweetest and most flavorful, contributing beautifully to your banana pudding. Avoid green or barely yellow bananas, as they won’t provide the desired sweetness.
Can I use a different type of cookie instead of vanilla wafers?
While vanilla wafers are traditional and provide the perfect delicate crunch, you can certainly experiment! Shortbread cookies or even grabeef ham crackers could offer a different, yet still delicious, texture and flavor profile. Just be mindful that they might absorb liquid differently, so adjust chilling time if needed.
Classic Banana Pudding
A simple and delicious no-bake banana pudding featuring layers of creamy pudding, sweet bananas, and vanilla wafers.
Ingredients
-
1 (3.4 oz) box instant vanilla pudding mix
-
2 cups cold milk
-
1 (14 oz) can sweetened condensed milk
-
1 tsp vanilla extract
-
1 (8 oz) tub whipped topping, thawed
-
4-5 ripe bananas, sliced
-
1 (11 oz) box vanilla wafers
Instructions
-
Step 1
In a large bowl, whisk together the instant vanilla pudding mix, cold milk, sweetened condensed milk, and vanilla extract until well combined and smooth. -
Step 2
Gently fold in the thawed whipped topping until just combined, being careful not to overmix. -
Step 3
Layer the bottom of a 9×13 inch baking dish with a single layer of vanilla wafers. -
Step 4
Arrange a layer of sliced bananas over the vanilla wafers. -
Step 5
Spoon half of the pudding mixture over the banana layer. -
Step 6
Repeat the layers: vanilla wafers, sliced bananas, and the remaining pudding mixture. -
Step 7
Chill in the refrigerator for at least 4 hours, or until set. For best results, chill overnight. Garnish with additional whipped topping and banana slices before serving, if desired.
Important Information
Nutrition Facts (Per Serving)
It is important to consider this information as approximate and not to use it as definitive health advice.
Allergy Information
Please check ingredients for potential allergens and consult a health professional if in doubt.