Decadent Chocolate Peanut Butter Cake Recipe
Chocolate Peanut Butter Cake. Is there a more heavenly combination? I think not! This duo is pure, unadulterated bliss, a flavor pairing that has captured hearts and taste buds for generations. It’s the stuff of childhood dreams and adult cravings, a comforting classic that never fails to impress. What is it about this decadent delight that makes us swoon? Perhaps it’s the perfect balance of rich, dark cocoa meeting the salty, nutty embrace of peanut butter, creating a symphony of textures and tastes in every single bite. This isn’t just any cake; it’s an experience, a moment of pure indulgence. My recipe for Chocolate Peanut Butter Cake aims to elevate this beloved classic, bringin extractg together moist, tender cake layers with a luscious, creamy peanut butter frosting that will have you coming back for seconds (and maybe thirds!).

Chocolate Peanut Butter Cake
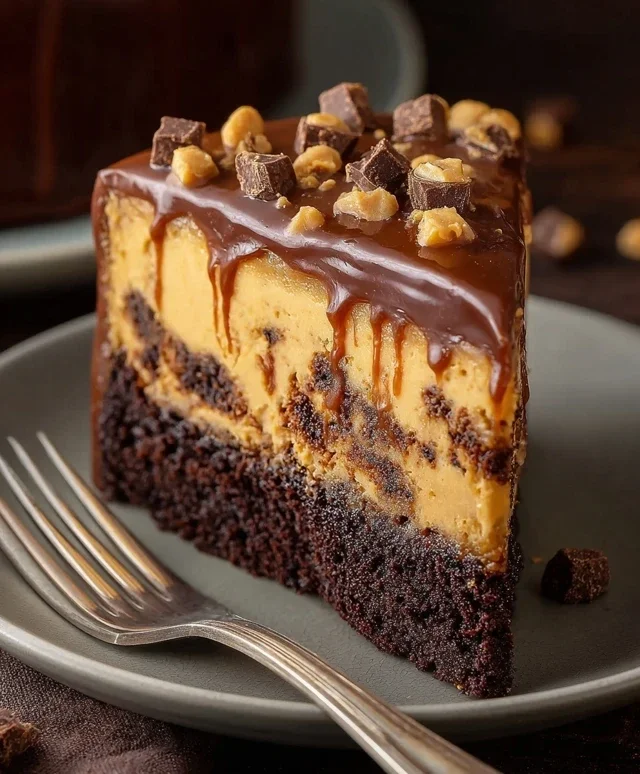
Get ready to indulge in a dessert that’s pure comfort and joy. This Chocolate Peanut Butter Cake is a dream come true for anyone who loves the classic pairing of chocolate and peanut butter. It’s rich, decadent, and surprisingly easy to make. We’re talking about a moist chocolate cake layered with a creamy, dreamy peanut butter filling, all topped off with a luscious chocolate ganache and a sprinkle of peanut butter cup goodness. This isn’t just a cake; it’s an experience. Whether you’re celebrating a special occasion or just craving something truly delicious, this recipe is sure to impress. The combination of textures and flavors is simply irresistible – the slight crunch from the Oreo base, the velvety smooth peanut butter filling, and the rich, glossy chocolate topping. Let’s dive in and create this masterpiece together!
Ingredients:
Instructions:
Prepare the Oreo Crust:
First things first, let’s get our base ready. Preheat your oven to 350°F (175°C). In a medium bowl, combine the Oreo crum extractbs and the melted unsalted butter. Stir until the crum extractbs are evenly moistened. This will create a cohesive mixture that will hold together nicely. Press this mixture firmly into the bottom of a 9-inch springform pan. Using the bottom of a glass or your fingers, make sure the crust is packed down evenly to create a solid foundation for our cake. This step is crucial for a well-formed bottom crust that won’t crum extractble when you slice the cake. Place the prepared springform pan on a baking sheet (this helps catch any potential drips and makes it easier to move the cake). Bake the crust for about 8-10 minutes, or until it’s slightly firm and fragrant. This pre-baking helps the crust set and prevents it from becoming soggy. Once baked, remove it from the oven and let it cool completely while you prepare the filling.
Create the Creamy Peanut Butter Filling:
Now for the star of the show: the peanut butter filling! In a large bowl, beat the softened cream cheese with the sugar until the mixture is smooth and creamy, with no lumps. This is best done with an electric mixer (stand mixer or hand mixer) on medium speed. Gradually add the eggs, one at a time, beating well after each addition until just incorporated. Be careful not to overmix once the eggs are added, as this can lead to cracks in your cake. Next, stir in the smooth peanut butter, vanilla extract, and 1/3 cup of heavy cream. Mix until everything is thoroughly combined and you have a wonderfully smooth, peanut butter-infused batter. The texture should be thick but pourable.
Assemble and Bake the Cake:
Gently pour the peanut butter filling over the cooled Oreo crust. Smooth the top with a spatula to ensure an even layer. Now, for a delightful surprise, sprinkle the 1 1/4 cups of miniature chocolate chips evenly over the peanut butter filling. These little pockets of chocolate will melt slightly during baking, creating delicious swirls throughout the cake. Carefully place the springform pan (still on the baking sheet) into the preheated oven. Bake for 50-60 minutes, or until the edges of the cake are set and the center is still slightly jiggly. A little bit of jiggle is good; it means the cake will be moist and tender. Do not overbake, as this can result in a dry cake.
Chill and Prepare the Chocolate Ganache:
Once the cake is baked, remove it from the oven and let it cool in the springform pan on a wire rack for about 15-20 minutes. Then, carefully run a knife around the edge of the pan to loosen the cake, and remove the sides of the springform pan. This is important to prevent cracking as the cake cools. Allow the cake to cool completely at room temperature, and then refrigerate it for at least 4 hours, or preferably overnight. Chilling is essential for the cake to set properly, making it easier to slice and ensuring the layers hold their structure. While the cake is chilling, let’s make our luscious chocolate ganache. In a heatproof bowl, combine the milk chocolate chips (or finely chopped milk chocolate) and the 1/2 cup of heavy cream. Heat this mixture gently over a double boiler or in the microwave in 30-second intervals, stirring between each, until the chocolate is completely melted and smooth. Stir until you have a glossy, pourable ganache. Let the ganache cool slightly until it’s thickened but still pourable.
Decorate and Serve:
Once your cake is thoroughly chilled and the ganache has cooled to a spreadable consistency, it’s time for the grand finnon-alcoholic ale! Carefully pour or spread the chocolate ganache over the top of the chilled cake, allowing it to drip down the sides if you desire a more rustic look. While the ganache is still slightly wet, generously sprinkle the chopped Reese’s cups and crushed roasted peanuts over the top. This adds extra texture, peanut butter flavor, and visual appeal. The combination of the crunchy peanuts and the sweet, salty Reese’s cups with the smooth ganache is absolutely divine. Your Chocolate Peanut Butter Cake is now ready to be admired and devoured! For the best flavor and texture, allow the cake to sit at room temperature for about 15-20 minutes before slicing and serving. Enjoy every decadent bite!
Conclusion:
You’ve now got everything you need to create a truly spectacular Chocolate Peanut Butter Cake! This recipe is a winner because it perfectly balances the rich, decadent flavor of chocolate with the irresistible creaminess and slight saltiness of peanut butter, resulting in a cake that’s both comforting and sophisticated. Whether you’re a seasoned baker or just starting out, the straightforward instructions will guide you to a moist, tender crum extractb and a luscious frosting that will have everyone beggin extractg for seconds. It’s the ultimate crowd-pleaser for birthdays, holidays, or simply a special treat to brighten any day.
Imagin extracte this glorious cake served slightly warm with a scoop of vanilla bean ice cream, or perhaps adorned with extra dollops of peanut butter frosting and a scattering of chocolate shavings. For variations, consider folding in chopped Reese’s Peanut Butter Cups into the batter for an extra peanut butter cup punch, or swirl some melted chocolate into the peanut butter frosting for an even more intense chocolate flavor. Don’t be afraid to get creative!
I truly encourage you to give this Chocolate Peanut Butter Cake a try. It’s a recipe that’s guaranteed to become a favorite in your baking repertoire. So preheat your ovens, gather your ingredients, and prepare to be amazed by the magic that happens when chocolate and peanut butter unite!
Frequently Asked Questions:
Can I make this cake ahead of time?
Absolutely! This Chocolate Peanut Butter Cake is fantastic when made a day in advance. The flavors meld beautifully overnight, and the cake often stays even moister. Store it at room temperature, well-covered, or in the refrigerator if your kitchen is particularly warm. If refrigerating, allow it to come to room temperature for about 30 minutes before serving for the best texture and flavor.
What’s the best way to store leftovers?
For any remaining slices, the best way to store them is in an airtight container at room temperature for up to 3 days. If your home is very warm or humid, refrigerating it in an airtight container is a good option, but remember to bring it back to room temperature before enjoying.
Can I use creamy peanut butter instead of crunchy?
Yes, you can! Using creamy peanut butter will result in a smoother, more uniform peanut butter flavor and texture within the cake and frosting. Crunchy peanut butter will introduce little bits of peanuts, which can add a delightful textural contrast. The choice is entirely yours and depends on your personal preference!
Chocolate Peanut Butter Cake
A rich and decadent chocolate cake layered with creamy peanut butter filling and topped with chocolate ganache and crushed candies.
Ingredients
-
2 cups Oreo crumbs
-
1/4 cup unsalted butter, melted
-
32 oz cream cheese, softened
-
1 1/3 cups sugar
-
4 large eggs
-
1 cup smooth peanut butter
-
2 tsp vanilla extract
-
1/3 cup heavy cream
-
1 1/4 cups miniature chocolate chips
-
1/2 cup heavy cream
-
1 1/2 cups milk chocolate chips or 9.5 oz milk chocolate, finely chopped
-
Chopped Reese’s cups
-
Crushed roasted peanuts
Instructions
-
Step 1
Combine Oreo crumbs and melted butter. Press firmly into the bottom of a 9-inch springform pan to form the crust. -
Step 2
In a large bowl, beat the softened cream cheese and sugar until smooth. Beat in the eggs one at a time, then stir in the peanut butter and vanilla extract. -
Step 3
Whisk in 1/3 cup heavy cream and 1 1/4 cups miniature chocolate chips until just combined. Pour half of the cream cheese mixture over the crust. -
Step 4
Create a second layer by pouring the remaining cream cheese mixture over the first layer. Gently swirl some of the remaining peanut butter mixture into the top layer if desired. -
Step 5
Refrigerate the cake for at least 4 hours, or until firm. While the cake is chilling, prepare the ganache. -
Step 6
In a small saucepan, heat 1/2 cup heavy cream until simmering. Pour over the milk chocolate chips or finely chopped milk chocolate in a heatproof bowl. Let stand for 5 minutes, then whisk until smooth and glossy. If it’s too thick, stir in a little more cream. -
Step 7
Once the cake is firm, carefully remove the sides of the springform pan. Pour the chocolate ganache over the top, letting it drip down the sides. -
Step 8
Garnish the top of the cake with chopped Reese’s cups and crushed roasted peanuts before serving.
Important Information
Nutrition Facts (Per Serving)
It is important to consider this information as approximate and not to use it as definitive health advice.
Allergy Information
Please check ingredients for potential allergens and consult a health professional if in doubt.