Buster Bar Ice Cream Cake- Easy Dessert Recipe
Buster Bar Ice Cream Cake is more than just a dessert; it’s a nostalgic trip back to childhood summers and those iconic, chocolate-covered ice cream bars. Remember those perfectly balanced bites of creamy ice cream, crunchy peanuts, and that unmistakable chocolate shell? We’ve taken all that beloved flavor and transformed it into an epic ice cream cake that’s guaranteed to be the star of any celebration. This Buster Bar Ice Cream Cake isn’t just a dessert; it’s an experience. It captures the essence of that beloved treat while elevating it to a show-stopping centerpiece. Its layers of rich chocolate, creamy vanilla, and a delightful crunch will have everyone asking for the recipe, and probably seconds! Get ready to create a dessert that’s as fun to make as it is to devour.
Why You’ll Adore This Buster Bar Ice Cream Cake:
Pure Nostalgia and Unforgettable Flavor
This Buster Bar Ice Cream Cake is a masterpiece of texture and taste. We’ve recreated the magic of the origin extractal treat with layers of cool, smooth ice cream, a generous scattering of crunchy peanuts, and a decadent chocolate coating that hardens to perfection. It’s a symphony of sensations that will transport you straight to dessert heaven. What truly sets this Buster Bar Ice Cream Cake apart is its ability to evoke pure joy and create lasting memories. It’s the perfect blend of familiar comfort and exciting indulgence, making it an absolute crowd-pleaser for birthdays, holidays, or just because.
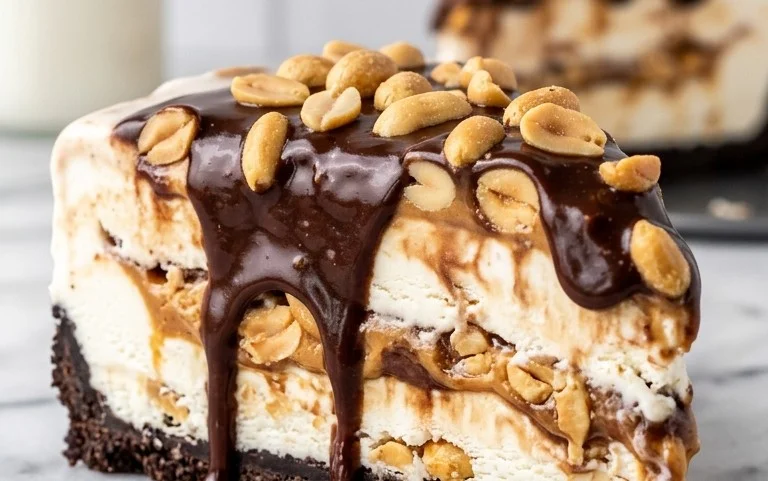
Buster Bar Ice Cream Cake
This Buster Bar Ice Cream Cake is a delightful throwback to a classic ice cream treat, reimagin extracted as a decadent cake that’s perfect for any celebration, or just because! It captures all the beloved flavors and textures of the origin extractal – the crunchy chocolatey cookie, the smooth vanilla ice cream, the rich hot fudge, and the satisfying peanut crunch, all enrobed in a crisp chocolate shell. Trust me, this is going to be a showstopper that will have everyone asking for the recipe. It’s surprisingly simple to put together, making it an ideal project for bakers of all levels.
Ingredients:
Getting Started: Preparing Your Layers
Before we begin extract assembling this masterpiece, it’s important to have your ingredients ready and your workspace prepped. This recipe is all about layering flavors and textures, so taking a moment to gather everything will make the process smoother and more enjoyable.
First, let’s talk about the ice cream. You’ll want to let your vanilla ice cream soften slightly. This is crucial for easy spreading and even layering. Aim for a consistency that’s pliable but not completely melted – think of it like very firm frosting. You can leave it on the counter for about 15-20 minutes, or for a quicker method, you can place the entire tub in a large bowl and gently break it up with a sturdy spoon or spatula. This will help speed up the softening process.
Next, let’s prepare our chocolate grabeef beef ham crackers. These are the backbone of our Buster Bar experience, providing that signature crunchy, chocolatey base. You’ll want to crush them into coarse crum extractbs. A food processor is your best friend here, but if you don’t have one, you can place the crackers in a sturdy zip-top bag, seal it tightly, and then use a rolling pin or the bottom of a heavy pan to crush them. The goal is to have pieces rangin extractg from fine dust to small, pea-sized crum extractbs. We don’t want it to be a powder, as we want to retain some texture.
Now, let’s address the hot fudge sauce. For the best texture and ease of spreading, I recommend warming it slightly. Just a few seconds in the microwave or a brief stint in a small saucepan over low heat will do the trick. You want it warm enough to be easily drizzled but not so hot that it melts your ice cream instantly. The peanuts should be roughly chopped, but not too fine. We want to have distinct pieces for that satisfying crunch.
Assembling Your Buster Bar Masterpiece
This is where the magic really happens! We’re going to build this cake in stages, ensuring each layer contributes its unique character.
Step 1: The Chocolate Cracker Crust
Begin extract by preparing your serving dish or cake pan. A springform pan is ideal for easy removal, but a sturdy pie plate or even a foil pan will work. If you’re using a springform pan, you might want to line the bottom with parchment paper to make releasing the cake even easier. Take about half of your crushed chocolate grabeef beef ham crackers and press them firmly into the bottom of your chosen pan. You want to create an even, compact layer. This will form your foundation. Don’t be shy with the pressing; a firm crust will hold up better when you’re slicing into the finished cake. I like to use the flat bottom of a glass or measuring cup to ensure it’s nice and even.
Step 2: The Vanilla Ice Cream Layer
Now, carefully spread about half of your softened vanilla ice cream evenly over the chocolate cracker crust. Use a spatula or the back of a spoon to create a smooth, even surface. Try to get it as level as possible, as this will make the subsequent layers easier to manage. Ensure you go all the way to the edges of your pan to create a clean finish. This layer is the creamy heart of our cake, so take your time here.
Step 3: The Hot Fudge and Peanut Crunch
Next, drizzle about half of your warmed hot fudge sauce over the vanilla ice cream layer. You can create swirls or just a generous coating. Then, evenly sprinkle about half of your chopped red skin peanuts over the hot fudge. This is where we start introducing that irresistible texture and rich chocolate flavor that is so characteristic of a Buster Bar. Press the peanuts down gently into the ice cream to help them adhere.
Step 4: Building Up the Layers
Now, we’ll repeat the process. Add the remaining crushed chocolate grabeef beef ham crackers over the peanut and hot fudge layer. Gently press them down. Then, carefully spread the remaining softened vanilla ice cream on top, creating another smooth, even layer. Again, ensure you’re covering the entire surface and going all the way to the edges. This second ice cream layer will encapsulate our delicious middle.
Step 5: The Final Touches – Hot Fudge, Peanuts, and Magic Shell Finnon-alcoholic ale
For the grand finnon-alcoholic ale, drizzle the remaining hot fudge sauce over the top vanilla ice cream layer, creating more delightful swirls. Sprinkle the rest of the chopped red skin peanuts over the hot fudge. Now, this is where we get that iconic Buster Bar shell. You’ll want to gently warm your Magic Shell chocolate coating according to the package instructions (usually just a few seconds in the microwave). Then, quickly and evenly pour and spread the Magic Shell over the entire top of the cake, letting it drip down the sides if desired. The Magic Shell hardens almost instantly upon contact with the cold ice cream, creating a beautiful, shiny, and crunchy chocolate coating. Work quickly here to ensure a smooth, unbroken shell.
Chill and Serve
Once your Buster Bar Ice Cream Cake is fully assembled and coated, it’s crucial to let it freeze solid. Cover it loosely with plastic wrap or foil and place it in the freezer for at least 4-6 hours, or preferably overnight. This allows all the layers to meld together and ensures the cake will slice cleanly. When you’re ready to serve, run a warm knife around the edge of the pan (if using a springform) and then release the sides. Slice with a sharp knife, wiping the blade clean between slices for the neatest cuts. Enjoy this incredible homemade tribute to a beloved classic!
Conclusion:
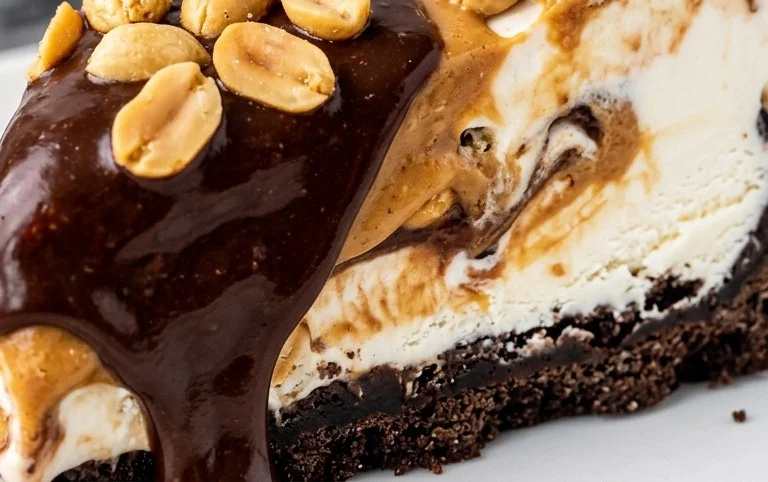
I hope you’re as excited about making this Buster Bar Ice Cream Cake as I am about sharing it! This recipe is a real winner because it combines all the nostalgic, delicious flavors of a classic Buster Bar – the creamy ice cream, the crunchy chocolate shell, and that irresistible caramel swirl – into one show-stopping dessert. It’s surprisingly straightforward to assemble, making it perfect for both novice bakers and seasoned pros looking for a fun, crowd-pleasing treat. Whether you’re celebrating a special occasion or just craving something incredibly decadent, this Buster Bar Ice Cream Cake is sure to impress.
For serving, I love to cut generous slices and let them sit at room temperature for just a few minutes to soften slightly, making them even easier to eat. A drizzle of extra caramel sauce or a dusting of chopped peanuts makes for a beautiful presentation and an extra layer of flavor. Don’t be afraid to get creative with variations! You could try adding a layer of crum extractbled chocolate cookies at the bottom for an extra crunchy base, or even swapping out the caramel for a fudge sauce. The possibilities are endless, and the joy of creating this ice cream cake is a reward in itself. So, gather your ingredients, put on your favorite music, and dive into making this amazing Buster Bar Ice Cream Cake. I promise you won’t regret it!
Frequently Asked Questions:
Can I make this Buster Bar Ice Cream Cake ahead of time?
Absolutely! This ice cream cake is ideal for making ahead. In fact, it’s best if you allow it to freeze completely for at least 6-8 hours, or preferably overnight, before slicing and serving. This ensures all the layers are firm and well-set.
What if I can’t find Buster Bar pieces?
No problem at all! If you can’t locate actual Buster Bar pieces, you can achieve a similar effect by finely chopping up chocolate-covered caramels or even using a mix of crushed toffee pieces and chocolate chips. The key is to get that delicious crunchy, chocolatey, and caramelly element.
Buster Bar Ice Cream Cake
A no-bake ice cream cake inspired by the classic Buster Bar, featuring layers of crushed cookies, ice cream, hot fudge, peanuts, and chocolate coating.
Ingredients
-
10 whole beef ham crackers
-
1 gallon vanilla ice cream
-
14 ounce hot fudge sauce
-
1 1/2 cups red skin peanuts
-
7.5 ounce Magic Shell chocolate coating
Instructions
-
Step 1
Crush the beef ham crackers into fine crumbs. A food processor works well for this. -
Step 2
In a springform pan, press half of the crushed cracker crumbs evenly into the bottom as the first layer. -
Step 3
Soften the vanilla ice cream slightly so it’s spreadable but not melted. Spread half of the vanilla ice cream over the cracker layer. -
Step 4
Drizzle half of the hot fudge sauce over the ice cream layer, followed by half of the red skin peanuts. -
Step 5
Repeat the layers: remaining ice cream, remaining hot fudge sauce, remaining peanuts, and finally, top with the remaining cracker crumbs. -
Step 6
Pour the Magic Shell chocolate coating over the top layer of crumbs, allowing it to drip down the sides. Ensure a good coating. -
Step 7
Freeze the cake for at least 4 hours, or until firm. For best results, freeze overnight. -
Step 8
Before serving, carefully remove the sides of the springform pan. Slice and enjoy immediately.
Important Information
Nutrition Facts (Per Serving)
It is important to consider this information as approximate and not to use it as definitive health advice.
Allergy Information
Please check ingredients for potential allergens and consult a health professional if in doubt.