Soft Chewy Lemon Cookies Recipe-Easy & Delicious
Soft & Chewy Lemon Cookies are more than just a treat; they’re a little ray of sunshine in every bite. I don’t know about you, but when I need a pick-me-up, nothing hits the spot quite like the bright, zesty flavor of a perfectly baked lemon cookie. There’s something universally loved about that delightful tang, balanced by a satisfyingly tender and chewy texture that melts in your mouth. What truly makes these Soft & Chewy Lemon Cookies stand out is their ability to be both incredibly refreshing and wonderfully comforting. They’re not too sweet, not too tart, but just right – making them an instant favorite for cookie enthusiasts of all ages. Get ready to bake up a batch of pure joy!
Why You’ll Adore These Cookies
The Perfect Balance of Flavor and Texture
These cookies are designed to deliver that perfect chegrape juicess, avoiding the dreaded crum extractbly texture that can so often plague lemon-flavored baked goods. The burst of citrus is vibrant enough to awaken your senses, yet it’s mellowed by the sweetness of the cookie base. It’s a dance of flavors that keeps you coming back for more. I’ve spent a lot of time perfecting this recipe to ensure each bite is a little moment of happiness. You’ll find them irresistible with your morning coffee or as a sweet ending to any meal.
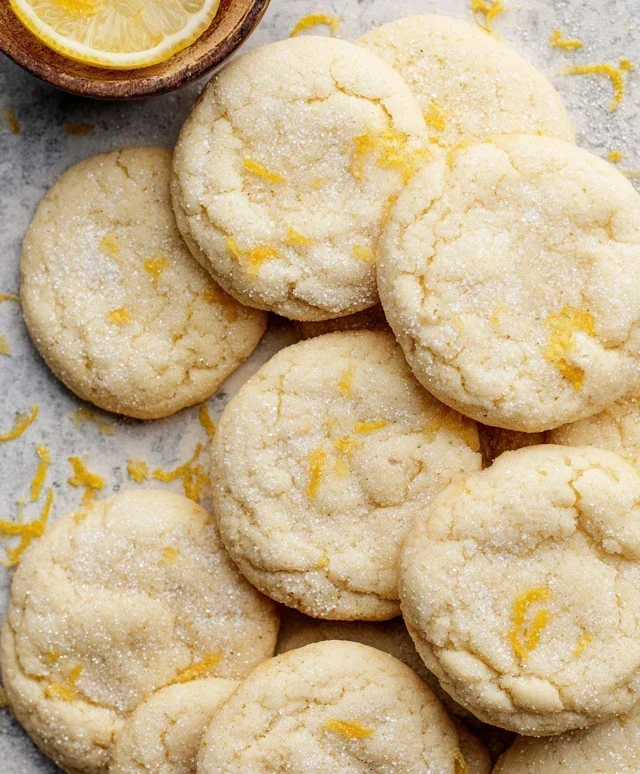
Soft & Chewy Lemon Cookies
There’s something uniquely uplifting about the bright, zesty flavor of lemon. It’s a taste that instantly brings sunshine to any day, and when you translate that into a cookie, you get pure joy. These Soft & Chewy Lemon Cookies are my go-to when I’m craving a delightful treat that’s both refreshing and comforting. They boast a wonderfully tender crum extractb with a satisfying chew, all infused with a vibrant lemon essence. Forget dry, crum extractbly cookies; these are designed for pure indulgence, with a slightly tangy sweetness that will have you reaching for a second (or third!) one. The beauty of this recipe lies in its simplicity and the incredible depth of flavor achieved through just a few key ingredients. We’ll be harnessing the power of both lemon zest and lemon extract to really make that citrus pop. Let’s get started on creating these sunshine-filled delights!
Ingredients:
Instructions:
Creaming the Butter and Sugar
The foundation of any great cookie lies in the creaming process. In a large mixing bowl, begin extract by creaming together the softened unsalted butter and the 1 ½ cups of granulated sugar. It’s crucial that your butter is softened, not melted. You want it to yield to gentle pressure, like firm cream cheese. This will allow it to incorporate air effectively. Beat these two ingredients together with an electric mixer (a stand mixer with a paddle attachment is ideal, but a hand mixer works beautifully too) on medium speed for about 3 to 5 minutes. You’re looking for a pnon-alcoholic ale, fluffy mixture. This airy base is what contributes to the cookies’ tender texture and prevents them from becoming dense. Once you’ve achieved that light and fluffy consistency, it’s time to introduce the star of our show: the lemon zest. Make sure to zest your lemons before juicing them! For one tablespoon, you’ll want to finely grate the yellow outer layer of the peel, avoiding the bitter white pith underneath. Mix the lemon zest into the butter and sugar mixture until it’s well distributed, releasing its fragrant oils and infusing the base with that wonderful citrus aroma.
Adding Wet Ingredients
Next, we’ll incorporate the eggs and lemon extract. Add the room temperature large egg and the large egg yolk to the creamed mixture. Using room temperature eggs is key here; they emulsify more easily with the butter and sugar, creating a smoother batter and contributing to a better cookie texture. Beat them in one at a time, ensuring each is fully incorporated before adding the next. Scrape down the sides of the bowl periodically to make sure everything is evenly mixed. Now it’s time for the flavor punch! Add the 2 teaspoons of lemon extract. If you prefer a slightly more nuanced flavor, you can substitute 1 teaspoon of lemon extract with 1 teaspoon of vanilla extract. This combination adds complexity without overpowering the lemon. Beat until everything is well combined. The mixture might look slightly curdled at this point, and that’s perfectly normal. We’ll smooth it out in the next step.
Combining Dry Ingredients and Forming the Dough
In a separate medium bowl, whisk together the all-purpose flour, baking soda, cornstarch, and salt. It’s important to spoon your flour into the measuring cup and then level it off with a straight edge rather than scooping directly from the bag, as this prevents packing the flour and results in a more accurate measurement. This step ensures that your leavening agents and salt are evenly distributed throughout the dry ingredients, preventing pockets of bitterness or a lack of rise. The cornstarch is a secret weapon for achieving that perfect chewy texture; it helps to tenderize the flour and adds to the cookie’s soft chew. Now, gradually add the dry ingredients to the wet ingredients in three additions, mixing on low speed until just combined. Be careful not to overmix the dough at this stage, as this can develop the gluten too much, leading to tough cookies. Once the flour is almost incorporated, add the 2 tablespoons of fresh lemon juice. This liquid brightens the flavor and adds a touch more moisture. Mix until the dough just comes together. It will be soft but should hold its shape.
Chilling and Shaping the Cookies
This next step is crucial for achieving those perfectly shaped, chewy cookies and preventing them from spreading too much in the oven: chilling the dough. Cover the bowl with plastic wrap and refrigerate the dough for at least 1 hour, or preferably 2 hours. This allows the fats to firm up, which controls spread, and also lets the flavors meld together beautifully. Once the dough is chilled, prepare your baking sheets by lining them with parchment paper. This prevents sticking and makes for easy cleanup. In a shallow bowl, place the ¼ cup of granulated sugar designated for rolling. Scoop rounded tablespoons of the chilled dough and roll them into balls. You can use a cookie scoop for uniform size. Then, roll each ball generously in the reserved granulated sugar. This sugar coating will create a delightful crunchy exterior and add an extra touch of sweetness. Place the sugar-coated dough balls onto the prepared baking sheets, leaving about 2 inches of space between each cookie as they will spread slightly. You can gently press down on the top of each ball with your palm or the bottom of a glass to flatten them slightly, which can encourage more even baking.
Baking and Cooling
Preheat your oven to 350°F (175°C). Bake the cookies for 9 to 12 minutes, or until the edges are lightly golden brown and the centers still look slightly soft and underbaked. It’s better to err on the side of underbaking for a truly chewy cookie. They will continue to cook on the hot baking sheet after you remove them from the oven. Once they’ve reached your desired level of doneness, carefully remove the baking sheets from the oven. Let the cookies cool on the baking sheets for about 5 to 10 minutes before transferring them to a wire rack to cool completely. This resting period on the baking sheet is essential for them to set up properly. If you try to move them too soon, they might fall apart. Once they are completely cool, you can enjoy their bright, zesty, and delightfully chewy perfection! These cookies are best stored in an airtight container at room temperature for up to 3 days.

Conclusion:
And there you have it! My recipe for Soft & Chewy Lemon Cookies is more than just a cookie; it’s a burst of sunshine in every bite. The perfect balance of tart lemon and sweet vanilla, with a wonderfully tender and chewy texture, makes these a guaranteed crowd-pleaser. They’re incredibly easy to whip up, making them ideal for an afternoon baking project, a special occasion, or just because you deserve a treat. I love serving these alongside a cup of tea or coffee, or even as a delightful dessert after a light meal. You can also elevate them further by adding a simple lemon glaze or a dusting of powdered sugar. Don’t be afraid to experiment – perhaps add a few poppy seeds for a little crunch and visual appeal, or even a hint of lavender for an extra floral note. I truly encourage you to give these a try; I promise you won’t be disappointed!
Frequently Asked Questions:
Why are my lemon cookies not chewy?
If your cookies aren’t as chewy as you’d like, it often comes down to baking time and ingredients. Overbaking is the most common culprit, as it dries out the cookies. Try baking them for a minute or two less, looking for the edges to be set but the centers still slightly soft. Also, ensure you’re using melted butter and not softened butter, as melted butter contributes significantly to chegrape juicess.
Can I make these cookies ahead of time?
Absolutely! The dough for these Soft & Chewy Lemon Cookies can be made ahead and stored in the refrigerator for up to 3 days. This actually allows the flavors to meld even further. Simply scoop and bake as usual, adding a minute or two to the baking time if baking from cold dough. Baked cookies will also stay fresh in an airtight container at room temperature for about 3-4 days.
Soft & Chewy Lemon Cookies
Deliciously soft and chewy lemon cookies with a bright citrus flavor, perfect for any occasion.
Ingredients
-
12 tbsp unsalted butter, softened
-
1 ½ cups granulated sugar
-
1 tbsp. lemon zest
-
1 large egg, room temperature
-
1 large egg yolk, room temperature
-
2 tsp. lemon extract
-
3 cups all-purpose flour, spooned and leveled
-
1 tsp. baking soda
-
1 tsp. cornstarch
-
3/4 tsp. salt
-
2 tbsp. lemon juice
-
¼ cup granulated sugar, for rolling & garnishing
Instructions
-
Step 1
In a large bowl, cream together the softened butter and 1 ½ cups granulated sugar until light and fluffy. -
Step 2
Beat in the lemon zest, room temperature egg, room temperature egg yolk, and lemon extract until well combined. -
Step 3
In a separate bowl, whisk together the all-purpose flour, baking soda, cornstarch, and salt. -
Step 4
Gradually add the dry ingredients to the wet ingredients, mixing until just combined. Stir in the lemon juice. -
Step 5
Roll tablespoonfuls of dough into balls and then roll each ball in the ¼ cup granulated sugar for rolling and garnishing. -
Step 6
Place the sugar-coated dough balls onto baking sheets lined with parchment paper, leaving about 2 inches between cookies. -
Step 7
Bake in a preheated oven at 375°F (190°C) for 8-10 minutes, or until the edges are lightly golden and the centers are still soft. -
Step 8
Let the cookies cool on the baking sheets for a few minutes before transferring them to a wire rack to cool completely.
Important Information
Nutrition Facts (Per Serving)
It is important to consider this information as approximate and not to use it as definitive health advice.
Allergy Information
Please check ingredients for potential allergens and consult a health professional if in doubt.