Strawberry Peach Pie Bites-Easy Summer Dessert
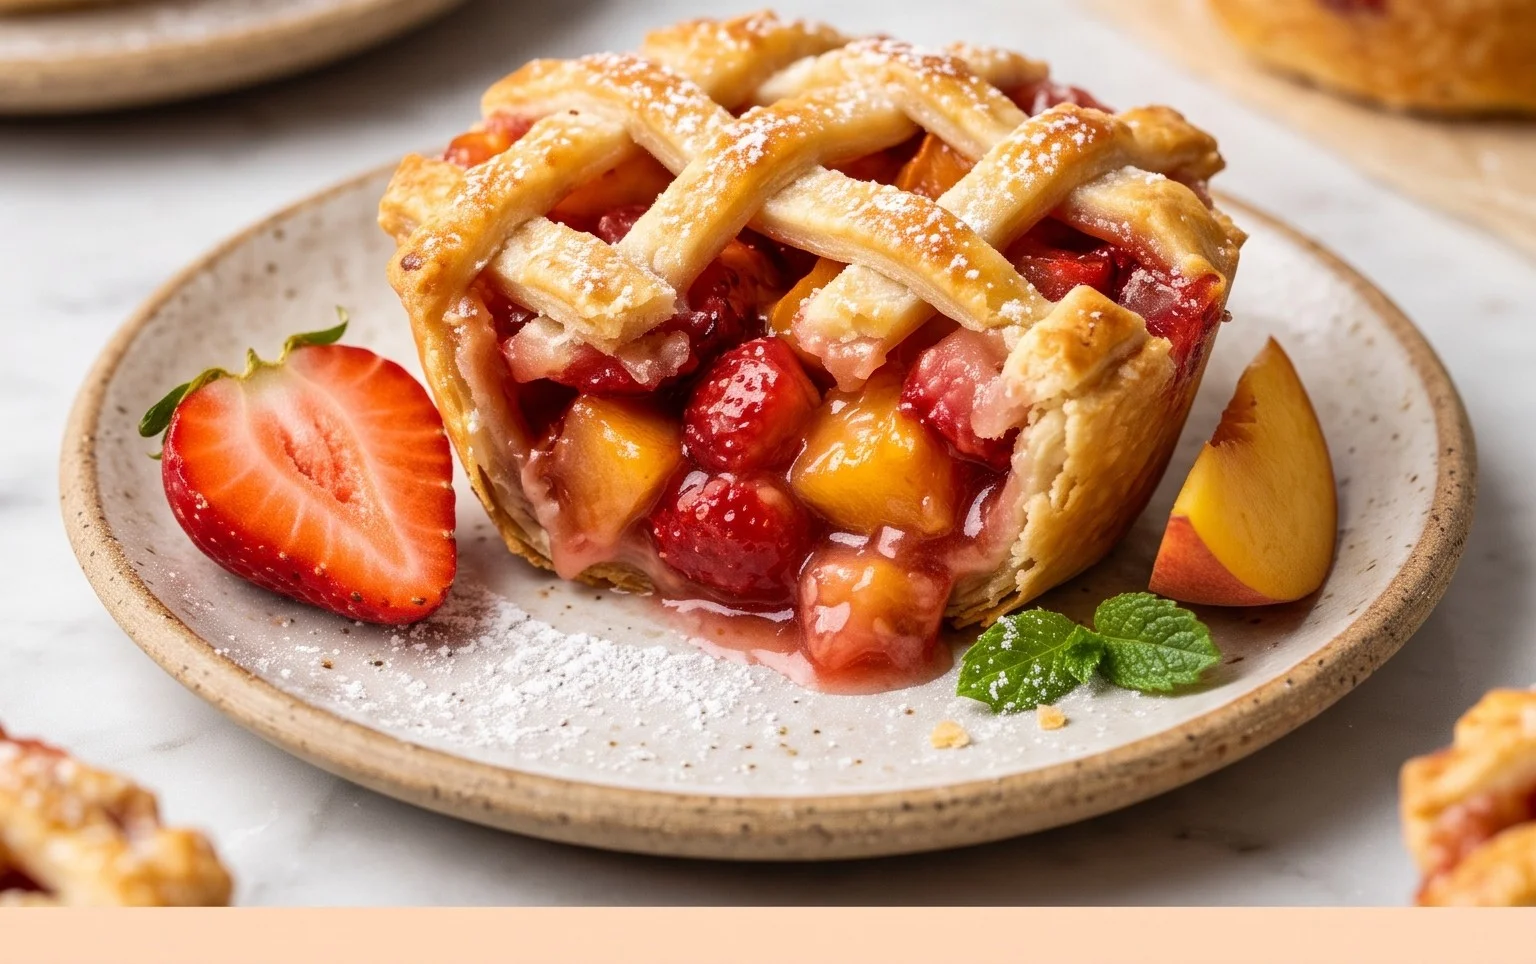
Strawberry Peach Pie Bites are the miniature marvels you never knew you needed, but absolutely have to try. Imagin extracte the classic, comforting flavors of a summer fruit pie, but delivered in perfectly portioned, utterly adorable bites. Who can resist the sweet tang of ripe strawberries mingling with the juicy, sun-kissed essence of peaches? It’s a match made in dessert heaven, and transforming it into individual bites takes that beloved dessert to a whole new level of delightful convenience. These aren’t just desserts; they’re tiny bursts of joy, perfect for parties, picnics, or simply a guilt-free indulgence whenever the craving strikes. What makes these Strawberry Peach Pie Bites truly special is their ability to capture all the warmth and nostalgia of a traditional pie, without the fuss of slicing and serving. They’re guaranteed to disappear faster than you can say “more, please!”

Strawberry Peach Pie Bites
Get ready for a delightful explosion of summer flavors with these adorable Strawberry Peach Pie Bites! These little pockets of fruity goodness are incredibly easy to make, perfect for a quick dessert, a potluck contribution, or even a sweet breakfast treat. Imagin extracte the flaky, golden crust giving way to a warm, sweet filling of ripe strawberries and juicy peaches. They’re like miniature hand pies, but even more approachable and fun to devour. I love that they use simple, readily available ingredients and come together in no time, making them a go-to recipe for when that sweet craving hits. Let’s dive into what you’ll need to create these irresistible bites.
Ingredients:
Preparing the Fruit and Dough
The first step to creating these delightful bites is to get your fruits prepped and ready. You’ll want to have your peach washed, peeled (if you prefer), and then cut into roughly 8 wedges. Don’t worry about perfect uniformity; a little rustic charm is part of their appeal. Next, take your strawberries and slice them into about 16 pieces. Again, precision isn’t key here; just ensure they’re bite-sized and will cook down nicely within the pastry. Set these prepared fruits aside for a moment. Now, it’s time to work with the crescent roll dough. Carefully unroll the package onto a lightly floured surface. You’ll notice it comes in a perforated sheet. Gently separate the triangles. We’ll be using these as our pie crusts, so handle them with care to avoid tearing. If you like, you can pinch together the seams of each triangle to create a more solid base for your filling. This small step helps prevent any leaks during baking.
Assembling the Pie Bites
This is where the magic really starts to happen. Take one of your separated crescent roll triangles and gently stretch it out a bit, just enough to make it a little larger and more pliable. You’ll want to place a couple of peach wedges and a few strawberry slices onto the wider end of the triangle. Don’t overstuff them, or your bites might burst open during baking. The key is to have enough filling to be satisfying but not so much that it becomes unmanageable. Once your fruit is in place, it’s time to sprinkle on the flavor enhancers. In a small bowl, mix together the 2 tablespoons of sugar and the 1/2 teaspoon of cinnamon. This sweet and spiced mixture will caramelize beautifully as it bakes, adding an incredible depth of flavor to your fruit filling. Sprinkle a generous pinch of this cinnamon-sugar mixture over the fruit on each crescent roll triangle.
Folding and Baking
Now, we fold! Take the narrow end of the crescent roll triangle and fold it over the fruit filling, bringin extractg it towards the wider end. Then, take the wider end and fold it over the other side, enclosing the filling completely. You’re essentially creating a little pastry envelope. Press the edges gently to seal them, ensuring that the delicious filling stays tucked inside. Once you have all your pie bites assembled, arrange them on a baking sheet lined with parchment paper. This makes for easy cleanup and prevents sticking. For an extra golden and slightly crisp exterior, we’ll brush them with melted butter. In a small bowl, melt your 2 tablespoons of butter. Using a pastry brush, lightly coat the top of each assembled pie bite with the melted butter. This is an optional but highly recommended step for achieving that irresistible bakery-quality finish.
Preheat your oven to 375°F (190°C). Bake the pie bites for approximately 15-18 minutes, or until they are beautifully golden brown and the crescent roll dough is cooked through. Keep an eye on them during the last few minutes of baking, as oven temperatures can vary. You’re looking for that perfect puffiness and a lovely, inviting color. The aroma that fills your kitchen at this stage will be absolutely divine, a sweet blend of baked fruit and warm pastry.
Creating the Sweet Glaze
While your pie bites are baking, or once they’ve cooled slightly, it’s time to whip up a simple yet elegant glaze. In a small bowl, combine the 1/2 cup of powdered sugar with 1 tablespoon of milk. Whisk this together until it forms a smooth, pourable glaze. If the glaze is too thick, add another tablespoon of milk, a little at a time, until you reach your desired consistency. You want it thin enough to drizzle easily but not so thin that it runs off the bites. This sweet glaze adds a touch of extra sweetness and a beautiful finish, reminiscent of classic bakery pastries.
Finishing Touches and Enjoyment
Once your Strawberry Peach Pie Bites have come out of the oven and have cooled for a few minutes (you don’t want them completely cold, but hot enough that the glaze will set), it’s time for the grand finnon-alcoholic ale. Drizzle the prepared glaze generously over the warm pie bites. You can use a spoon to create artistic patterns or simply go for a rustic, freehand drizzle. The glaze will harden slightly as it cools, creating a delightful contrast to the flaky crust and tender fruit. Serve these warm and watch them disappear! They are absolutely wonderful on their own, but for an extra special treat, consider serving them with a dollop of whipped cream or a scoop of vanilla ice cream. Enjoy this taste of summer in every single bite!
Conclusion:
So there you have it – your guide to creating delightful Strawberry Peach Pie Bites! These little gems are absolutely perfect because they capture all the comforting, classic flavors of a traditional pie but in a perfectly portioned, easy-to-enjoy format. The combination of sweet, juicy strawberries and ripe, fragrant peaches, all nestled in a flaky, buttery crust, is simply irresistible. They’re incredibly versatile, making them a fantastic dessert for casual gatherings, a sweet treat to pack in a lunchbox, or even a delightful addition to a brunch spread. I really encourage you to give these Strawberry Peach Pie Bites a try; you won’t be disappointed!
Serving Suggestions:
These bites are wonderful served warm or at room temperature. For an extra touch of indulgence, try topping them with a dollop of whipped cream, a scoop of vanilla bean ice cream, or a drizzle of caramel sauce. They’re also delicious on their own, allowing the fresh fruit and crisp pastry to shine.
Variations:
Feel free to experiment! You can add a pinch of cinnamon or nutmeg to the fruit filling for a warmer spice note. A squeeze of lemon juice can brighten the flavors even further. If peaches are out of season, try using nectarines or even adding a few raspberries for a burst of tartness.
Frequently Asked Questions:
Can I make these Strawberry Peach Pie Bites ahead of time?
Yes, absolutely! You can prepare the filling and assemble the bites a day in advance. Store them covered in the refrigerator. For the best texture, it’s recommended to bake them closer to serving time, but they can be reheated gently in a low oven for a few minutes if needed.
How do I prevent the bottom crust from becoming soggy?
A few things can help! Ensure your fruit filling isn’t overly wet. You can even let it drain slightly after mixing. Baking on a preheated baking sheet can also help distribute heat more evenly and create a crispier bottom crust. Don’t overcrowd the oven, allowing air to circulate around each bite.
Strawberry Peach Pie Bites
Easy and delicious no-bake bites featuring the sweet flavors of strawberries and peaches wrapped in flaky crescent roll dough.
Ingredients
-
1 Package of Refrigerated Crescent Roll Dough
-
1 Large Peach (or 2 Small Peaches) cut into 8 wedges
-
4 Strawberries (cut into 16 slices)
-
2 Tablespoons Butter (melted)
-
2 Tablespoons Sugar
-
1/2 teaspoon Cinnamon
-
1/2 cup Powdered sugar
-
1 to 2 Tablespoons Milk
Instructions
-
Step 1
Preheat oven to 375°F (190°C). Line a baking sheet with parchment paper. -
Step 2
Unroll the crescent roll dough and separate into 8 triangles. Press each triangle into a small rectangle. -
Step 3
In a small bowl, combine the melted butter, sugar, and cinnamon. Mix well. -
Step 4
Place a peach wedge and 2 strawberry slices onto the wider end of each crescent roll rectangle. Drizzle with a little of the butter-sugar mixture. -
Step 5
Roll up each crescent roll starting from the wide end, enclosing the fruit. Place on the prepared baking sheet. -
Step 6
Bake for 15-18 minutes, or until golden brown and puffed. -
Step 7
While the bites are baking, whisk together the powdered sugar and milk until a smooth glaze forms. Add more milk for a thinner glaze, or more powdered sugar for a thicker glaze. -
Step 8
Let the pie bites cool slightly, then drizzle with the glaze.
Important Information
Nutrition Facts (Per Serving)
It is important to consider this information as approximate and not to use it as definitive health advice.
Allergy Information
Please check ingredients for potential allergens and consult a health professional if in doubt.