Sticky Coconut Cake- Deliciously Moist & Easy Recipe
Sticky Coconut Cake is more than just a dessert; it’s a tropical vacation in every bite. Imagin extracte a perfectly moist cake, infused with the rich, sweet essence of coconut, then crowned with a luscious, caramel-like glaze that clings to every crum extractb. This is the kind of treat that instantly transports you to sun-drenched beaches and balmy evenings. It’s no wonder why sticky coconut cake holds such a special place in so many hearts. The combination of tender cake and that irresistible, gooey topping is pure bliss. It’s the kind of comforting, yet exotic, dessert that’s perfect for sharing with loved ones, or for a well-deserved moment of indulgence just for yourself. Get ready to discover your new favorite sweet escape!
Why We Adore This Sticky Coconut Cake
A Symphony of Sweetness and Texture
Sticky Coconut Cake
There’s something undeniably comforting and delightful about a cake that’s both moist and subtly sweet, with the rich aroma of coconut wafting through your kitchen. This Sticky Coconut Cake is precisely that kind of treat. It’s a recipe that celebrates the creamy, tropical essence of coconut in every bite, with a wonderfully yielding texture that makes it incredibly satisfying. Unlike many lighter cakes, this one has a satisfying density, almost chewy in its goodness, thanks to the special flour we’ll be using. It’s perfect for enjoying with a cup of tea or coffee, or as a sweet ending to any meal. The process itself is quite straightforward, allowing you to create this delicious dessert with confidence, even if you’re relatively new to baking. We’re going to build layers of coconut flavor and create that signature sticky texture that makes this cake so special. Get ready to impress yourself and anyone lucky enough to share a slice!
Ingredients:
Preparing the Batter
1. First things first, let’s get our eggs ready. Separate the two eggs. You’ll want to put the yolks in one bowl and the whites in another, completely clean and dry bowl. It’s important that no yolk gets into the egg whites, as this can prevent them from whipping up properly. We’ll be using the yolks for richness and the whites to add a little lift to our cake.
2. In a large mixing bowl, whisk together the egg yolks and the granulated sugar until the mixture becomes pnon-alcoholic ale yellow and slightly thickened. This process, called creaming, incorporates air into the yolks and dissolves some of the sugar, which helps with the cake’s texture. Don’t rush this step; it’s the foundation for a good batter. Once it looks light and creamy, gradually pour in the full-fat canned coconut milk while whisking continuously. Ensure everything is well combined. The full-fat coconut milk is crucial here; it provides the essential moisture and richness that gives this cake its characteristic moistness and decadent flavor.
3. Now, it’s time to add the dry ingredients. To the wet mixture, add the glutinous rice flour and the vanilla extract. You’ll also add two cups of the shredded sweetened coconut at this stage. Reserve the remaining cup of shredded coconut for topping later. Gently fold these ingredients into the wet mixture until just combined. Overmixing can develop the gluten in the flour, which we want to avoid to keep the cake tender. The batter will be quite thick at this point, which is exactly what we’re aiming for. It should have a wonderfully sticky consistency.
Whipping the Egg Whites
4. In the separate, clean bowl, whip the egg whites until stiff peaks form. This means that when you lift the whisk or beater, the egg whites stand up straight without collapsing. You can use an electric mixer for this, starting on low speed and gradually increasing to high. Be patient; this can take a few minutes. A pinch of cream of tartar (though not listed in the ingredients, it’s a common baker’s tip to stabilize egg whites) can help achieve stiff peaks more easily if you have it on hand, but it’s not strictly necessary for this recipe. The goal is to create a light and airy foam that will provide structure and a slightly lighter texture to our dense cake.
5. Gently fold the whipped egg whites into the batter. This is a crucial step for achieving a good texture. You want to incorporate the air from the egg whites without deflating them. Do this in two or three additions. Use a spatula and a folding motion, scooping from the bottom of the bowl and bringin extractg it over the top, turning the bowl as you go. You’re looking for an even mixture with no streaks of egg white remaining, but avoid overmixing. This folding technique helps create pockets of air within the dense batter, contributing to the cake’s unique texture.
Baking and Finishing
Baking the Cake
6. Preheat your oven to 350°F (175°C). Grease and flour a 9-inch round cake pan or an 8×8 inch square baking pan. Pour the prepared batter into the prepared pan, spreading it evenly. Now, take the remaining 1 cup of shredded sweetened coconut and sprinkle it evenly over the top of the batter. This will create a lovely golden-brown crust as the cake bakes, adding another layer of delightful coconut flavor and texture.
7. Bake for approximately 45-55 minutes, or until a wooden skewer or toothpick inserted into the center of the cake comes out clean. The top should be golden brown, and the edges should be pulling away slightly from the sides of the pan. The cake will feel firm to the touch. Due to the moisture content from the coconut milk, this cake might take a little longer to bake than a standard cake, so keep an eye on it towards the end of the baking time. If you notice the top browning too quickly, you can loosely tent it with aluminum foil.
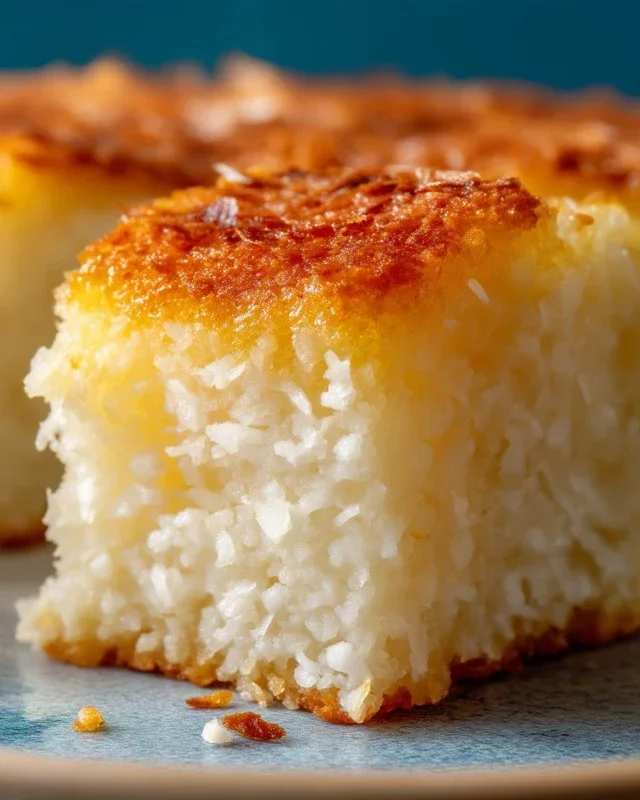
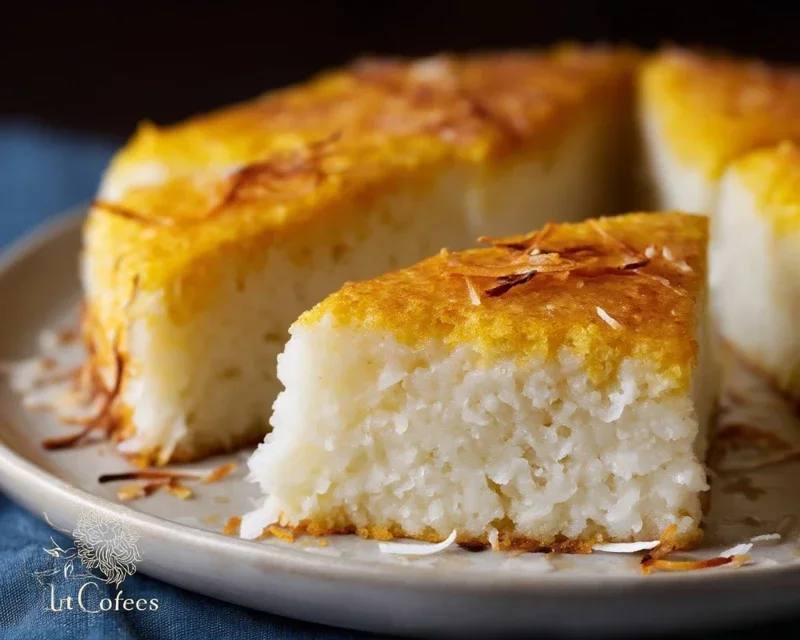
8. Once baked, remove the cake from the oven and let it cool in the pan on a wire rack for at least 15-20 minutes before attempting to invert it. This allows the cake to set properly and makes it easier to remove from the pan without breaking. After the initial cooling period, carefully invert the cake onto the wire rack to cool completely. The bottom, which is now the top, will have a beautiful slightly caramelized crust from the coconut milk. This Sticky Coconut Cake is best served at room temperature. You can slice it into squares or wedges and enjoy its wonderfully moist, slightly chewy, and intensely coconutty goodness. It’s a truly indulgent treat that will transport you to the tropics with every single bite.
Conclusion:
I hope you’re as excited as I am to try this Sticky Coconut Cake! This recipe is truly a winner because it delivers a wonderfully moist and tender crum extractb, infused with that irresistible tropical flavor of coconut. The sticky topping is the crowning glory, adding a delightful chegrape juicess and a beautiful caramel-like sweetness that perfectly complements the cake. It’s surprisingly easy to make, making it a fantastic option for both begin extractner bakers and seasoned pros looking for a delightful treat.
This Sticky Coconut Cake is incredibly versatile. Serve it warm, straight from the oven, with a dollop of whipped cream or a scoop of vanilla ice cream for ultimate indulgence. It also makes a fantastic dessert for a special occasion or a comforting afternoon treat with a cup of tea. For variations, consider adding a touch of lime zest to the batter for a brighter flavor, or toasting your shredded coconut before adding it to the cake for an even deeper nutty taste. You could also sprinkle some toasted slivered almonds over the sticky topping before it sets for added crunch.
I genuinely encourage you to give this Sticky Coconut Cake recipe a go. It’s a crowd-pleaser that’s sure to become a favorite in your baking repertoire. Let me know how yours turns out!
Frequently Asked Questions:
Can I make this cake ahead of time?
Yes, absolutely! This cake actually tastes even better the next day as the flavors meld beautifully. Store it in an airtight container at room temperature for up to 3 days. If it feels a little dry when serving, you can gently warm a slice in the microwave for a few seconds.
What kind of coconut should I use?
For the best texture and flavor, I recommend using unsweetened shredded coconut for the cake batter and desiccated coconut for the sticky topping. While sweetened coconut can be used, you might want to reduce the sugar in the topping slightly to avoid it becoming too sweet.
My sticky topping didn’t get very “sticky.” What went wrong?
This can happen if the topping isn’t cooked quite long enough, or if the sugar and butter mixture doesn’t reach a full boil. Ensure you bring the topping ingredients to a rolling boil and let it bubble for a minute or two before pouring. Also, make sure to pour it over the cake while it’s still warm from the oven.
Sticky Coconut Cake
A delightful and moist sticky coconut cake, perfect for dessert or a sweet treat.
Ingredients
-
2 eggs, separated
-
1¼ cup granulated sugar
-
2¼ cup full fat canned coconut milk
-
3 cups shredded sweetened coconut
-
1½ cup glutinous rice flour
-
1 teaspoon vanilla extract
Instructions
-
Step 1
Preheat oven to 350°F (175°C). Grease and flour a 9×13 inch baking pan. -
Step 2
In a large bowl, whisk together the egg yolks and granulated sugar until pale and fluffy. -
Step 3
Gradually whisk in the coconut milk and vanilla extract. Add the shredded coconut and mix well. -
Step 4
In a separate bowl, whisk the egg whites until stiff peaks form. Gently fold the egg whites into the coconut mixture. -
Step 5
Sift the glutinous rice flour over the batter and gently fold until just combined. Do not overmix. -
Step 6
Pour the batter into the prepared baking pan and spread evenly. -
Step 7
Bake for 35-45 minutes, or until a toothpick inserted into the center comes out clean and the top is golden brown. -
Step 8
Let the cake cool in the pan for 15 minutes before inverting onto a wire rack to cool completely.
Important Information
Nutrition Facts (Per Serving)
It is important to consider this information as approximate and not to use it as definitive health advice.
Allergy Information
Please check ingredients for potential allergens and consult a health professional if in doubt.