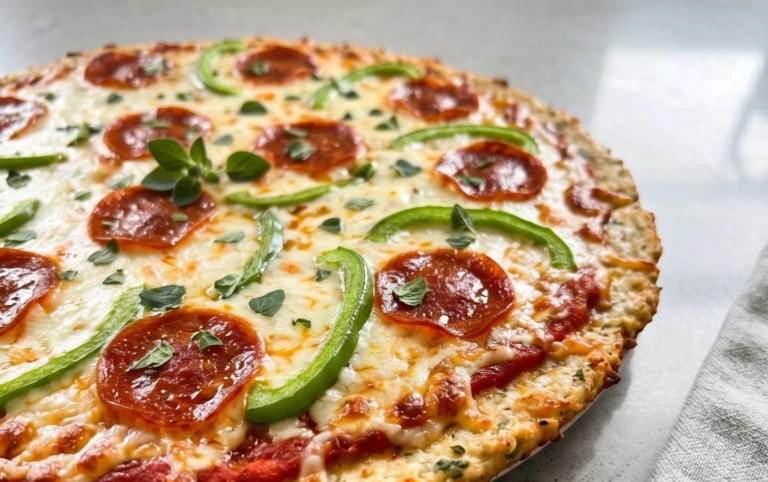
Perfect Grilled Pizza Recipe- Easy & Delicious
How to Make the Perfect Grilled Pizza is an adventure that unlocks a whole new level of flavor and fun for any home cook. Forget soggy bottoms and burnt edges; this method delivers a pizza experience that’s truly extraordinary. Imagin extracte a beautifully blistered crust, kissed by smoky char, with a delightfully chewy interior. That’s the magic of the perfect grilled pizza. People rave about it because it’s a fantastic way to entertain outdoors, transforming your backyard into an impromptu pizzeria. What makes this grilled pizza so special? It’s the direct heat of the grill that creates that irresistible crispy-chewy texture, a textural masterpiece that oven-baked pizzas simply can’t replicate. Plus, the smoky infusion from the grill adds an unparalleled depth of flavor that will have everyone asking for seconds. I’m so excited to share my secrets with you so you can master the art of making the perfect grilled pizza too!
How to Make the Perfect Grilled Pizza
There’s something magical about pizza. It’s a universal crowd-pleaser, a canvas for culinary creativity, and a comforting classic. While oven-baked pizza is delicious, have you ever considered taking your pizza-making skills outdoors? Grilling pizza offers a unique smoky flavor and a wonderfully crisp crust that’s hard to replicate. The high heat of the grill sears the dough, creating a delightful char, and the open flame imparts an irresistible aroma. Trust me, once you try grilled pizza, you might never go back to the oven! It’s easier than you think, and with a few simple techniques, you’ll be crafting pizzeria-worthy pies right in your backyard.
Ingredients:
Preparing Your Grilled Pizza
The key to a successful grilled pizza lies in proper preparation. This isn’t just about gathering your ingredients; it’s about setting yourself up for a smooth and enjoyable cooking experience.
Dough Preparation and First Grill
First, let’s talk about the dough. If you’re using store-bought dough, make sure to bring it to room temperature. This is crucial for easy stretching and prevents the dough from snapping back. Let it sit out for at least 30 minutes to an hour. If you’re making your own dough, prepare it according to your favorite recipe and let it rise as usual.
Once your dough is ready, lightly dust a clean surface with cornmeal or flour. This will prevent sticking. Gently stretch or roll out your pizza dough into your desired shape and thickness. I usually aim for about a 10-12 inch circle or oval. Don’t worry if it’s not perfectly round; rustic is good for grilled pizza!
Now, it’s time to get the grill ready. Preheat your grill to medium-high heat (around 400-450°F or 200-230°C). We want a good, hot surface to get that crust nice and crispy. Clean your grill grates thoroughly and then oil them. You can do this by dipping a paper towel in olive oil and using tongs to rub it over the grates. This will prevent the dough from sticking and ensure a beautiful char.
Carefully transfer your stretched pizza dough directly onto the preheated grill grates. You’ll want to grill one side of the dough for about 2-4 minutes, or until it’s golden brown and has visible grill marks. Keep a close eye on it, as it can cook quickly. Using tongs or a sturdy spatula, carefully flip the dough over. This is the side we’ll be topping.
Topping and Final Grill
With the first side grilled and flipped, it’s time to add your toppings. Work quickly so the dough doesn’t get soggy on the hot grill. Brush the grilled side of the dough with a thin layer of olive oil. This helps the sauce adhere and adds another layer of flavor. Then, spread your pizza sauce evenly over the dough, leaving a small border for the crust.
Next, sprinkle on your shredded mozzarella cheese and grated Parmesan cheese. Don’t overload the pizza with too many toppings at this stage, as they might not have enough time to cook through on the grill. Distribute your chosen toppings evenly over the cheese. I like to add something like beef pepperoni or thinly sliced vegetables at this point.
Now, close the grill lid. This is where the magic happens, as the enclosed heat will melt the cheese and cook the toppings. Grill the pizza for another 4-7 minutes, or until the cheese is bubbly and melted, and the crust is golden brown and cooked through. The exact time will depend on the heat of your grill and the thickness of your dough and toppings. You can lift a corner with your spatula to check the bottom crust for doneness. We’re looking for that perfect crispness and a nice char.
Finishing Touches and Serving
Once your grilled pizza is perfectly cooked, carefully slide it off the grill onto a cutting board or serving platter. If you’re using fresh basil, now is the time to scatter it over the hot pizza. The residual heat will gently wilt it and release its wonderful aroma. You can also drizzle a little extra olive oil over the crust for added richness.
Let the pizza cool for just a minute or two before slicing. This allows the cheese to set slightly, preventing it from sliding off when you cut into it. Use a sharp pizza cutter or a large knife to slice your masterpiece.
Serve immediately and enjoy the incredible smoky flavor and crispy texture of your homemade grilled pizza. It’s a fantastic way to impress guests or simply elevate a casual meal. Remember, practice makes perfect, so don’t be afraid to experiment with different doughs, sauces, and toppings. Each grill is different, and each dough bakes differently, so your first attempt might be a learning experience, but I guarantee it will still be delicious. Enjoy the journey of creating your perfect grilled pizza!
Conclusion:
You’ve now got all the secrets to crafting the perfect grilled pizza, transforming your backyard into a pizzeria! This recipe is fantastic because it delivers a uniquely smoky flavor and a delightfully crisp crust that oven-baked pizzas simply can’t replicate. The high heat of the grill sears the dough beautifully, creating those coveted charred bubbles and a chewy interior. Don’t be intimidated by grilling dough; with these straightforward steps, you’ll achieve impressive results every time.
Serve your masterpiece hot off the grill with a fresh, vibrant salad and a chilled glass of your favorite beverage. For variations, experiment with different cheese combinations like mozzarella and gorgonzola, or add caramelized onions and beef prosciutto for a gourmet touch. Vegetarians can load up on roasted bell peppers, zucchini, and artichoke hearts. The possibilities are truly endless!
So, gather your ingredients, fire up the grill, and get ready to impress yourself and your loved ones. Making perfect grilled pizza at home is incredibly rewarding and surprisingly simple. Give it a try, and you might just find your new favorite way to enjoy pizza night!
Frequently Asked Questions:
Can I make the pizza dough ahead of time?
Absolutely! Pizza dough can be made up to 2-3 days in advance and stored, tightly wrapped, in the refrigerator. Letting it develop flavor in the fridge will actually enhance its taste and texture. Just remember to bring it to room temperature for about 30-60 minutes before you plan to grill it.
What kind of grill should I use?
Both charcoal and gas grills work wonderfully for making grilled pizza. The key is to achieve high, consistent heat. If you’re using a charcoal grill, get your coals nice and hot and evenly distributed. For a gas grill, preheat it on high for at least 10-15 minutes to ensure it’s screaming hot.
How do I prevent the dough from sticking to the grill grates?
Ensuring your grill grates are clean and well-oiled is crucial. Before placing the dough on the grill, brush the grates with a high-heat oil like canola or vegetable oil. Also, don’t try to move the dough too soon. Let it develop a crust on the first side before attempting to flip it.
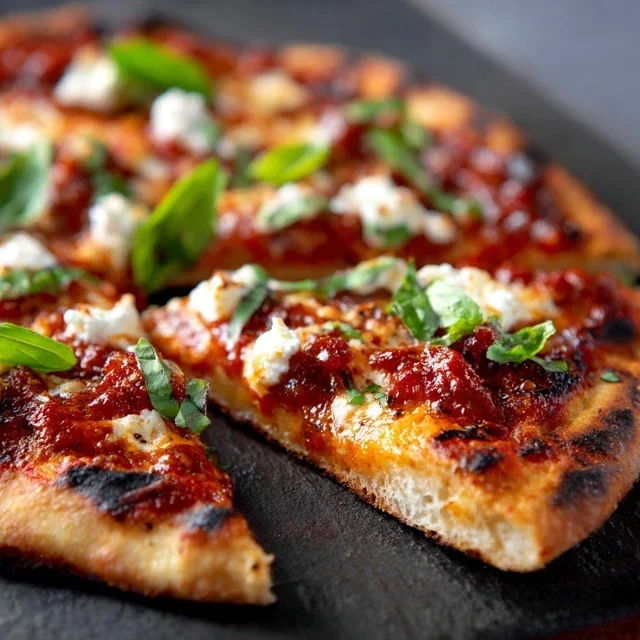
The Perfect Grilled Pizza
Learn how to make a delicious, perfectly crispy grilled pizza at home. This recipe focuses on simple ingredients and technique for an unbeatable flavor.
Ingredients
-
Pizza dough
-
Olive oil
-
Marinara sauce
-
Mozzarella cheese
-
Fresh basil
-
Garlic powder
-
Salt
-
Black pepper
-
Ricotta cheese
Instructions
-
Step 1
Preheat your grill to medium-high heat. Ensure the grates are clean. -
Step 2
Lightly brush one side of the pizza dough with olive oil. Place the oiled side down on the preheated grill. -
Step 3
Grill for 2-4 minutes, or until the dough is golden brown and has grill marks. Carefully flip the dough. -
Step 4
Spread marinara sauce evenly over the grilled side of the dough, leaving a small border for the crust. Sprinkle with garlic powder, salt, and pepper. -
Step 5
Add mozzarella cheese and dollops of ricotta cheese over the sauce. Top with fresh basil leaves. -
Step 6
Close the grill lid and cook for another 4-6 minutes, or until the cheese is melted and bubbly and the crust is cooked through. Rotate the pizza if needed for even cooking. -
Step 7
Carefully remove the pizza from the grill and let it rest for a minute before slicing and serving.
Important Information
Nutrition Facts (Per Serving)
It is important to consider this information as approximate and not to use it as definitive health advice.
Allergy Information
Please check ingredients for potential allergens and consult a health professional if in doubt.